To divide the spectrum of twinsock bikes from 1967 up to 1986 in four separate periods, that's comprehensible too me, also the extra class for tuned bikes.
Where would a TY 250 twinshock be categorized, this bikes was made in 1973/4 (model 434) but even in 1980 (model 516), changes where beside graphic's nearly imperceptible as far as I know?
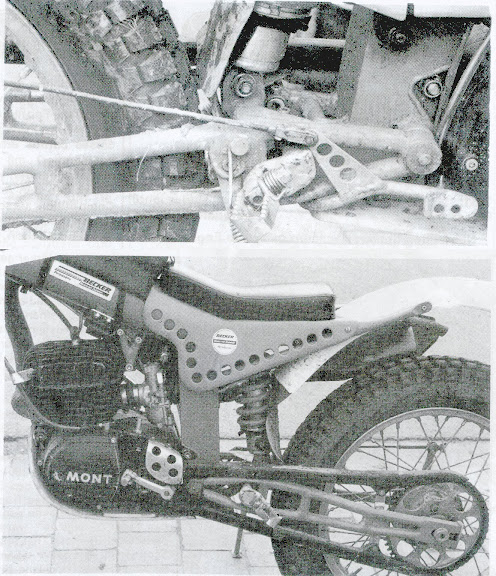
What about bikes that where made before eighties but where in technical standard much ahead like the Becker Montesas?
To the airboxes, many Bultaco riders used the Wolf airfilter box back then in Germany and Austria they where made in a small production run by an Austrian plumber (Mr. Wolf) and many Sherpas were fitted with these historical aftermarket component.
In other words is there a rule for contemporary "constructions" / set-up's could not find any?
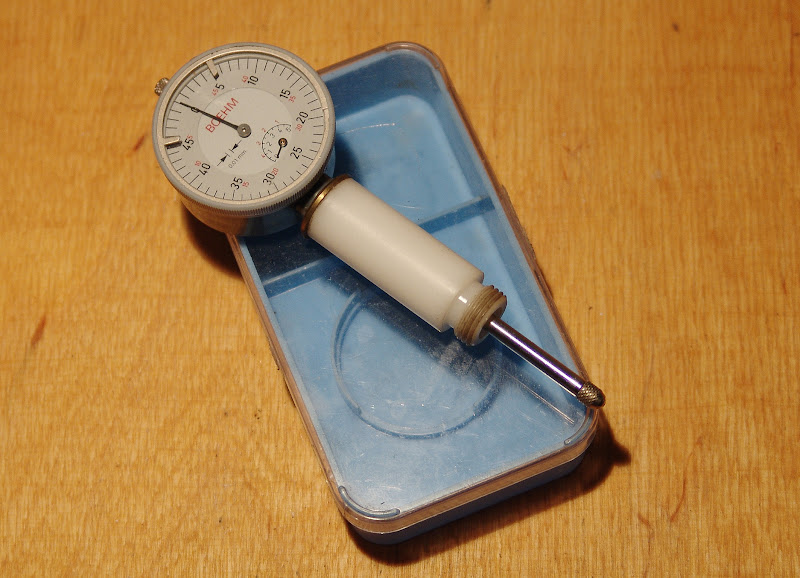
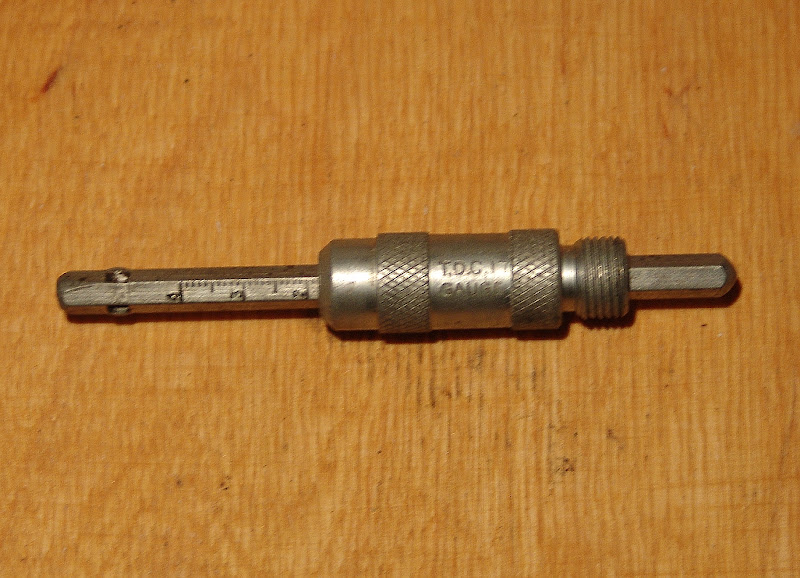
Just in own experience because I did tried out the stick with the embossed scale.
With that dipstick tool you might get an accurancy of around +/- 1mm, (beeing extremly fair).
The inaccuracies already in reading the scale, (which depends to the angle of view),
then the transfer to the rotor and the additional angle measurement will not lead to
good result maybe accidently this might happen ...
We don't have to forget it's an ultra short stroke with only 60mm.
But you will find out ...
The multimeter can detect electrical circuits and will then produce a beep, which is again much easier to hear when the points will close or open as with a light f. e. as you can then focus on other things and most household/riders do have a multimeter.
Btw. 01:
You will have to set the gap between the points first then the timimg. Sadly when setting the timing you can't measure when the points open or close, (this works only with the rotor mounted), so you will have to do the pocedure two to three times until you get the timing there where it belongs.
Have fun with the dipstick, you seem to have a lot of time ... and some resistent against a good tip
Btw. 02:
The red box is the original motoplat beeper for detecting when the point will open or close, for setting the timing correctly, but why do I explain anything here ???
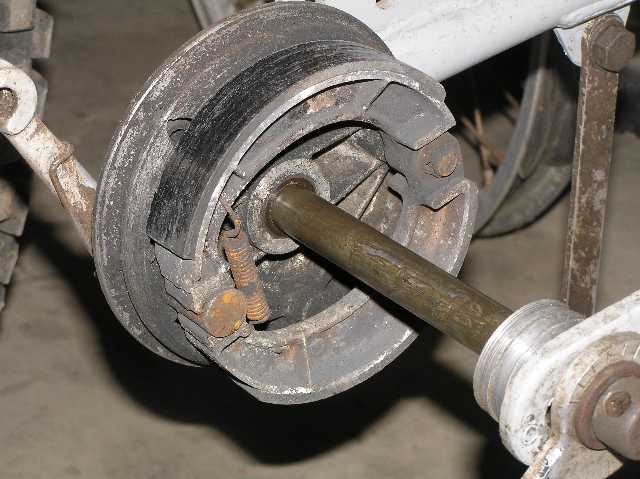
I don't think the different diameter of the round shaft for the brake shoes will have any noticeable effect.
The pin sits still so the brake shoes are turning around at the same axis.
The actuator pin with the oval cam press the shoes against the drum.
The main braking power for a single action drum brake as they are mounted on Bultaco, Honda or SWM is done by the leading brake shoe depending of the turning direction of the drum.
Here a sample picture, the right picture shows the drum brake in rest position, the left picture shows the drum brake actuated /engaged:
(The red area is the area where most praking power due to the wedge effect is produced, (the wedge effect depends to the direction in
which the drum / wheel is turning, when the wheel is turning counter clockwise it's the left brake shoe, when the weehl would turn
clockwise it's the right brake shoe)
As mentioned already you can look up the actuator pin if he is not worn out or will actuate the leading brake shoe slightly first when the drum/wheel is turning forward.
You can inforce the braking power for forward by modification of the oval cam shaft, but this will decrease the braking power when braking backward.
Mmmh so it was connected to the crank case weird ...
The YEIS system was used by some riders and even Montesa and other manufactorys in the mid 80's on works bikes for a period of time but then they abdoned the tests.
Maybe there were better solutions?
Anyway the benefits where heavily discussed back then and some home made solutions where mounted but in the beginning with no success.
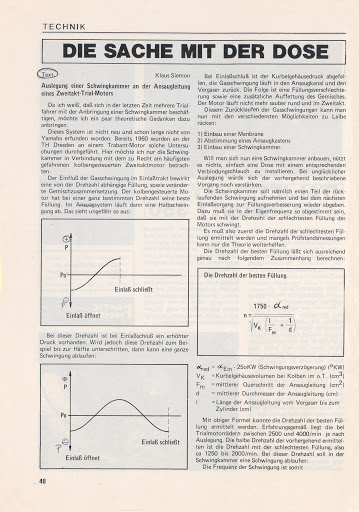
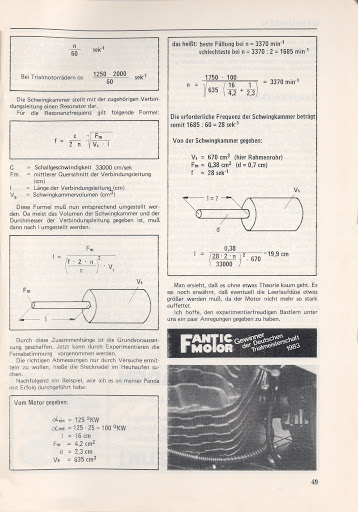
In February 1884 the calculation for the containment especially for trials engines where published in the German Trialsport magazine.
Some bikes where fitted with this modifications and it was reported with some benefits.
But this "fashion" was only used for a couple of years and these mods dissapeared again.
Here the article, you need some math and engine spec's to do it right ...:
The formulars works for every two stroke as long as you know the engine spec's.
The brass connection was to vacuum any build up of Unburnt fuel/oil from the crankcase, during a long downhill on closed throttle. Didn't really work.
I was hoping for any tips on setting up the carb as it and the engine are from a donner bike and I am still discovering "things" on this "ready to ride" bike.
Ross
Hi Ross,
is it similar to the Yamaha Energy Induction System which was developed for two stroke engines?
Wikipedia Germany translated:
"...The YEIS is a plastic container, which is connected with a rubber hose to the inlet of the engine.
This creates a kind of reservoir between the carburetor and cylinder, in this container the two-stroke mixture will be retained in closed gate positions
(little or no gas) until the slide is opened again.
The system also works as a vibration damper at certain speeds between the combustion chamber and carburetor oscillating back and forth gases.
The YEIS causes a better engine response, more torque at low and medium revs and a lower consumption by up to 10%. ..."
Did you encounter any probs getting a piston as i've heard they are unobtainable. Obviously untrue because you found one. I will be having mine rebuilt soon so will need one. Dont know what size yet untill the motor is stripped be just wondering about availability.
Still availble as I know and even NOS ???
The bore of a 199b is different to a 199a or erlier model, the earlier engines have 326,2 ccm engines with a 83,2 mm bore.
The engine of a 199b has 340,62 ccm and a bore of 85 mm. Stroke is the same with 60mm.
Important:
The hole in the piston for the piston pin of the 199b at least has to be out of the middle of the center too which prevents tipping of the piston.
PS: Nice Bultaco, I would tape the rips of to the seat cover if you want to stay with the original one.
May be some older motorcycles have a brake cam issue and the brake cams are not working properly any more due to wear.
As one side of the pads is always leading the other trailing in connection with the direction of rotation of the front wheel.
The term "leading/trailing" ("auflaufend/ablaufend" in German) is used for drum brakes.
One brake shoe is "leading", which means moving with the direction of rotation of the drum and thus exhibiting a self-applying, or self-servo effect, which means being dragged into the friction surface of the drum and therfore producing a greater braking force.
The other shoe is "trailing", moving against the direction of rotation, being thrown off the friction surface of the drum and not retarding the drum quite so effectively.
If the brake came is bend or the shaft / cam bearing worn or the bearing surfaces worn out the brake will have less breaking power too. You can test this by mounting the brake cam 180° turned around.
You can too force the breaking power of the leading shoe by grinding off a little bit of the brake cam side that is actuating the brake shoe that is trailingwhile the wheel is moving forward. Then more breaking power will be transferd to the leading shoe and produce a greater braking power. But then you will loose a lot of breaking power while going backwards.
(I will not recommend this because this is not road legal, (this is often discussed by German MZ riders)).
Mmmh ... It is possible to lock the rear and front wheel while riding on the road, but I need a lot of power to do so.
I have new pads mounted, the pad linings are centred and the chrome surface inside the hubs are in a good shape?
The brakes have long steel brake arms mounted, on the rear and front brakes, they were mounted by Bultaco, (Bultaco design but made out of steel, not alloy! Probably because of road registration):
(Even back then the brakes must had the possibility to lock the wheel as a part of practical testing the suitability of vehicle registration here in Germany).
Then I use new cables on the rear and front brake with oversized innercable to avoid any streching under load of the cable, (made by O. Colander).
Rearbrake foot lever is the original for the 199b made out of aluminium, a little bit thicker and shorter as the one for the former 199a.
A deep clean and roughten surfaces of the pads will help. Using new and soft pad material will help again.
BUT ... it's a drum brake and will be a drum brake in future.
Any drum brake is in comparison to todays disk brakes not efficient.
You might look up test from the past were these bikes where brand new, there where no complaints about the brakes back then, (I keep this in mind too).
I see a drum brake with pads that are not friction linings, instead sliding linings. These pads have a glazed surface by the left over/debris of brake pad material. So no wonder that they don't work properly.
Maybe this is forgotten wisdom as drum brakes on trials bikes where less and less fitted with the mid eighties ...
Drum brakes has to be maintainced regulary here:
- the hollow space,
- the pads and
- the mechanism
should be cleaned regulary from the remains of the brake pad's and other debris
as this will clogg the surfaces of the pads.
The pads of a drum brake has so much surface if you compare them to the pads of a disc brake you can't produce the same amount of pressure, (also due to the mechanical operation) and therby you have not the self cleaning effects on drum brakes as with modern disc brakes.
When you clean up the brake pads with a wire brush by hand or with a coarse abrasive cloth (again by hand) you will get a much better brake effency.
I hope this wasn't too instructive but it has to be said, regular maintaince and cleaning and you will discover a much better brake effency, even with a Bultaco.
I have ridden my SWM which has likewise drum brakes in design and performance in the Alpes and there where some really steep "downhill" sections and it worked (Not as good as with disc brakes, next time I will use a modern bike for sure ...).
I think it has mostly to do with the material of the brake pads the material has to be as soft as possible. As newer the pads and as more softer the material combination is as better the breaking power.
The softest brake pad material is organic the filling for organic brake pads is btw temperatur-resistant resin which will harden with the time, as harder the pad as less braking power you get. I think this is the main reason especially in combination with the chromed lining a soft brake pad workes much better then a hard one.
As the bike runs good if the engine is warmed up, I would look up the position of the float, might be not correct.
And then you might also look for a bigger choke jet, when it's cold the two stroke engine in general like a little bit fatter air gas mix for starting in my experience.
The subject of poor quality fuel comes up alot especially when it comes to classic bikes ( and cars ).Something that my mate mentioned might be worth looking into when it comes to two-strokes.He was at a course on chainsaws run by the council and they covered the maintenance as well as cutting.The instructor said that the fuel degrades lowering its octane rating in about six weeks! The pro tree surgeons buy a pre-mix ( already mixed ) that lasts much longer.I know chainsaws dont have massive tanks but i should imagine if you use it all day you must get through quite a bit.Cant remember what it's called but i'll ask and see what ratios it comes in.
That is exactly one reason why they invited this Aspen fuel, (the other reason is more to the health and enviroment related as this acylate fuel is not so toxic, doesn't smoke and when accidently poured to the ground will be decomposed from mother nature easier).
The backdraw is the price.
And I would not recommend to use the premix that is made for chain saws because it only has around 91 octane,


Piston Stop/ignition Timing
in Bultaco
Posted
Standard for the 199b with 340cc is 2,2mm in advance to TDC.