| |
-
I don't know if there are any readymade looms available, it also depends on you how many electrical components you will fit too the bike?
- lights, (for sure I believe),
- rear brake light,
- horn,
- flashes?
Base wiring, without lights:
The wiring loom with lights and horn and rear brake light is here:
Additional for flashes, "bull eye" type for the ends of the bar:
-
Yes, impact driver are good for getting loose single bolts, but don't use them where you have to thighten or loosing a group of bolts or nuts that hold the cylinderhead or sidecover or any other "extensive" component where the bolts has to be thightend to a special amount.
Very important while thghtening these fasteners is to thighten or take them loose in steps of around 3 - 5 Nm and then in the given order too, otherwise it is possible to tear off the bolt while using the wrong torque during thightening, or bending the cylinder head, ... any other planar mounted "extensive" component while thigthen or loosing the fasteners.
-
No problem I was fiddeling for the bike anyway. Just to note, the bike was sitting on a bike stand and I had 360mm long rear shocks
mounted, therefor the distance between rear engine bracket and chain tensioner mount, (or the screw holding the chain tensioner), is very short. There is now only 2-3mm between them when the shocks are completly rebounded. When the standard shocks are mounted the gap is around 5 - 7mm. If you which more clearance here you might mount the bracket for the chain tensioner some mm more backwards.
-
Just made some measurments for some other parts I want to build, (speedomount on the left engine side). As I was at the right bike side I did take some pic's and some measurments.
Pics:
The mount for the chain tensioner sits very close to the rear engine mount.
Here the rear brake cable stop:
Here the measurements in mm:
-
Yep the clutch side flywheell looks like it came from an older Pursang or a Matador as shown here:
Anyway biggest differences/effect will beto add weihgt or reduce weight to the ignition rotor side as the diameter is twice as big there.
I don't know if this a really big improvement to get the bike as "snappy" as possible, the Bultaco is in my personal experience much easier to ride using the torque and forget as much as possible the clutch while riding. When the bike is continous in movement the bike handles best, with the loss of too much flywheel weight the risk of stalling the engine is higher, ...
-
-
The flywheel weight on the clutch side is completly inductive hardened, so it is very very difficult to modify them, (like milling or grinding).
The difference in weight between the 350 and 250cc model on the clutch side is around 1kg, here a pic of the 250cc flywheelweight in the background and the 350cc flywheelweight in the foreground.
The weight of the 350cc model is about 2,85kg
The weight of the 250cc model is about 1,95kg
The biggest differences you can get using different rotors on the ignition side:
Femsa rotor for the 340cc Sherpa: 3,4 kg
Motoplat rotor for the 325cc Sherpa/Alpina: 3,7kg
Femsa rotor for the 250cc Sherpa/Alpina: 1,4kg
Modify the rotor will have a lot of effect as the diameter of the "flywheel" is a influence variable to the moment of inerta:
J = m * r^2
J: moment of inerta
m: mass
r: distance r from point mass
Will look up if I find some pic's of the different ignition rotors.
-
As you have two bikes, a little difference will make every day live brighter
For the speedo bracket mount, I will do the measurements and probably a template/model in this week,
Drawings follow this weekend, you can have the drawings for making your own bracket.
It will just be a bracket with an 90° angel, where the sockets between the axis of the front engine mount sits has an an offset to the mount of the speedo, leaving space for the wires of the ignition and the cable of the speedo.
The speedo mount will fit original speedo which is btw. still available as assembly version for the dashbord of the road models, (with chromed body not painted black).
-
Forgot the color question, Opel Signalblau or Ford electric blue might even match better. Anyway with the years the color will change and even if you have choosen the right color there will be a still remarkable variation when the paint is applied and dryed in different batches / production runs.
EDIT:
But it is very difficult to get powder coatings in car color specifications, here they use RAL or the NCS color system.
-
Yes, they where moved to the top of the fork clamps and mounted to the steering head nut with a steel bracket, this position is also very exposed, the bracket will bend very fast just because of the momentum of the weight of the speedo, (not kidding, here a photo when I picked up the bike).
In my very personal opinion the speedo is mounted more hided at the right side down, the boom where you mount the speedo has to be as short as possible and made out of 4mm alumium so it sit's very stabe.
Yes it is true that I will have some difficulties to read the speedo, but I don't care so much as max speed with full throttle down hill and with a storm from behind is around 95km/h, so I will have difficulties to brake the rules as even half throttle I would not use very long. The speedo is just mounted for the registration rules. I have a speedo mounted to the right fork leg on my other bike, (a SWM), this speedo is also very difficult to read off so I'am very used to this issue.
-
There where certainly some for the older Bultacos available but I don't think you get them anymore as a spare.
I have now got a short speedo wire for my Bultaco and will in this week do some CAD drawings of a speedo mount/bracket that will be mounted on the right side where the front engine mount sits. It's for my Bultaco Sherpa, the bracket will then be laser cutted out of strong aluminium, the machine can use cad drawings for cutting, I can seve some money if I do the dxf files for them. I don't know the costs yet but if you are interested?
-
The white color is RAL 9016, Verkehrsweiss, (traffic white).
The blue color is btw. RAL 5015, Himmelblau, (sky blue).
The blue is nice too:
-
Hi Bondy,
we had this a couple of month ago I believe, anyway for fun as you stated in your post could mean fun riding or fun=good looking.
I personal like the standard once too very much, sadly haven't found a pair NOS in good working condition, there are nearly likewise looking ones available too, price is around 80 - 90€.
Very good looking and working are Margicals with double or even triple springs.
Also very well working are NJB shocks.
Here the comparison with Betor original, Betor new and Magicals:
Here mounted Betors, standard ones which work as good or bad as the originals, little less suspension travel:
The Magicals with triple spring, the golden ones got a new powdercoat as I did not like the golden color:
-
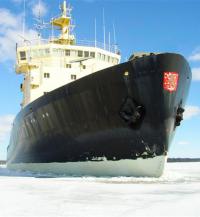
Looks like the bike is fitted with an metal petrol tank, this is indeed very nice, no problems with bubbling paint or discolored plastic.
-
You have detached the headstady I believe?
1. If you have remounted the screws and bolts and just thighten them "hand-thight" for lifting out the engine, (I lift out the engine while hold on the cylinder with one hand and the rear of the gearbox with the other, which suits / works best to lift out the heavy engine out of the frame for me, ( swing arm detached)), there should not have happend anything to the base gasket.
2. If you have not thigtehd the screws and bolts at the cylinder head and have used the cylinder for lifting the engine out of the frame the gasket which in my personal experience always stick a little bit in certain areas to the engine base and on other places to the cylinder the gasket may got ripped.
3. If you haven't touched the cylinder at all while getting out the engine, - must be very tricky -, then there should also not happend anything to the gasket.
Checking the base gasket if it is still in one piece is dfficult as already mentioned (# 2.) you can have ripped it or not. While checking it out you might rip the gasket too.
I personal can't give you a good advice here, only if the cylinder hasn't moved even a tenth of a mm away or sideways to the engine case during the removal of the frame the gasket should be OK.
If you have doubts and have a spare gasket or a spare gasket sheet from which you can cut out a new one mount a new one it's a easier to mount a new one now then to redo the complete procedure.
-
Maybe interesting for someone that will rebuild a later Piuma, some pic's of my 350cc.
When new:
Some month later, the day was cloudy, fitted the bike with lights again for a longer ride when I remember right:
Then the sun came out, have to look other old photos should be more somewhere?
-
Good idea, getting a proper working gas tank, leak free, ... is first duty, mounting any decals is freestyle and can be done later too.
Freehand painted "decals", as you might probably have seen on the photo are not so well in appereance.
-
Yes, it's possible if the tank is painted and has a smooth surface, like on the 199b models:
Original there where transfer decals mounted to the gas tanks of the 199b that where additional coated with a clear coat, the tendency that there will occur bubbles due to gas fumes is very high. Nowadays there are standard decals too available that you can mount without clear coat, these will last longer. Non of them will stick to the standard plastic gas tank as it has this special rough/textured surface.
Gas tanks 199b, behind original with bubbled of decals, some homemade paintings, ... foreground:
NOS Bultaco 199b painted and with decals (Italian model, no Sherpa sign on top):
To the solid colored plastic tanks with the textured surface, these logos where printed to the surface, as there are no punch/chop available anymore, you have to spray them on I would guess and you have to make your own jigs for this too, ...
This will work for the main side logos but not for the logos on the top.
Textured solid colored PE gas tank with stamped on logos:
The aluminium gas tanks that where very commen in your country would be the best solution, depending painting and decals.
-
The best would certainly be a compromise in my view:
- for beautyness, in my opinion the Bultaco 199b,
- for easyness of riding the Fantic 200 second 240,
- for parts it is still the Yamaha TY, here the 175cc model,
- for ownership and collecting value today the RTL 250 from Honda,
- for creativity in bikes specific design it's the Metatecno,
This is my personal view, certainly others have other models and brands in focus, for me it is therfore dificult just to choose one?
-
The Fantic's as already posted are surly in weight / power delivery / frame geometry for twinshock trials the best decision you can do.
Then it's up to personal taste, habits and ridingskills.
The Montesa, Bultaco and Ossa's from the end 70's to beginning 80's are good to but a little bit heavier.
The SWM of that time are little bit lighter.
The TY model are good workhorses, the Honda's this is somehow strange when they came out, they where expensive, there where not many around back then, but now you see much more of them (proportionally to the 2-strokers) and they are still expensive.
Which cc would you prefer?
-
To the Bultaco Sherpa T 250cc model 198 with Amal carburator:
main jet: 150
pilot jet: 20
slide: 3
needle: 3rd position
needle jet: 106
-
Maybe this pic will help you:
Patrik
-
The carb is from Dell'Orto i have a dealer here nearby, Stein-Dinse, he sells them, likewise jets, nozzels, ... http://www.stein-din...php?language=en
The bowl is special and is made by Malossi in Italy, they came out in 1981 with these, they where fancy to have and where mounted to the bike in the beginning 80's, a couple of years later this fashion was over again. Anyway, if you will get one, be aware, don't use to much force when fastening the screw they can crack easy, also the surface can be dull when using abrasive rags, ... it's still plastic, you can get them here: http://www.malossist...2.aspx?FG=D.ORT
Did you get your ignition sorted?
-
Mmmh never heard about an self adjusting ignition? Even the electronical ignition must get an impulse to produce the electricty for the spark. I would recommed to go through the manual that came with the ignition and follow the there recorded instruction very well. (I don't have an electronical ignition on my Sherpa but electronical ignition system on my KTM and the groundplate has to be adjust to some mm befor tdc otherwise the ignition will not work properly.)
To the crack you have in the airbox, that's a pitty but doesn't affect the gas air mixture, the same with any air leaks you have in the tubes or the airbox befor the air goes in the carb. It is good to close these air leaks but they will not affect the air gas mixture. Anyway if you have an air leak there the air that comes in is unfiltered which is not so good.
Any air leaks you have in the maifold or rubber tube between carburator and engine are a real problem as they will affect the air gas mixture (as already mentioned).
So the inner diameter of your rubber inlet is toO big for the connector of the carb, then you have to make you a bushing that will fit to the outer diameter of the connector of the carb and the inner diameter of the inlet rubber.
The differences between the connectors of the bing carb to a Dell'Orto you can see here, the differences to the Mikuni should be likewise:
So I had the same problem with the Dell'Orto carb which has too a much smaller connector, so I have made a bushing out of nylon as you can see here:
I had to make bushings on both sides as they where both smaller.
If you don't have any possibilities to turn you your own bushings you might talk to wayne weedon at billetparts, he makes tail adapters for carburators, mabe he will manufacture you a custom made for your Mikuni:
http://www.billetpar..._48.html?page=2
Without this issue fixed you can't use the carb for your Bultaco, running the engine too lean can lead to piston seize!
The heat of the engine is the result of a too lean gas-air mix where the main reason lies in your airleak or gap between manifold and carburator connector/tail.
-
If I have understood you right your engine is running hot after you have mounted the Mikuni carb, beside this the engine sound have changed.
If so your engine might run too lean, there can be different reasons for this, first you have a too small main jet installed, the ignition might not be adjusted right, you might have air leaks, ...
I would first try again with the original carb you might have from another bike, (when I understood right you have some Bultacos). If the engine runs fine with the original carb the ignition is not the problem if not adjust first the ignition until the engine runs very well.
Then mount the Mikuni carb again, there might be a difference in diameter between the inlet-rubber-tube and your carb and the connection is not air tight so the engine sucks additional air which leads to a too lean air gas mixture. You can check out the connections between carb and engine with brake cleaner.
Let the engine run (idle) the spray a little bit of air cleaner to the connection carb to inlet-rubber, if the engine starts to pick up rpm then you have an air leak and might need an extra bushing. I would also check the inlet rubber for cracks.
If the ignition is set properly and you have checked that there are no air leaks then I would take a bigger main jet, around 10% bigger then what you have installed now, this might work but if the bike still runs to lean you should post it and we will look further. Anyway it is very essential that all other components like ignition work very well before you can re-jet your carb to the engine.
|
|