| |
-
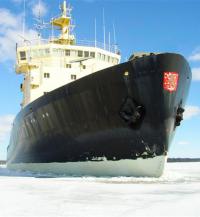
When it is contemporary than is OK, the grandfathering agreement here allows the exceptional of the principle, as we have a lot of self build bikes from the 60's and 70', like the Becker Montesa from 1979 f.e.:
which was with mono suspension and the frame including the gas tank much ahead of the time.
-
The "rebuild" was done with some efford but not finished I would say.
Quoted from the seller: "The disk brakes are original, ... "(original from which period, bike, ... ??? I will only believe this by proof, never heard from a trials machine from 1967 with disk brakes??? but if someone know, show and tell there is no problem to educate me ),
If the front brake is not contemporary the bike would not be legal at most events in Germany.
The exhaust looks strange and unfinshed too, the tank appears to be very large, it looks unbalanced in first view, the pic's aren't the best and the rest of the bike is hided in the shadow, (may be better so). A good project bike for further building up for sure.
-
There should be filled up with 180 cc or 0.18 liter oil for each "forkleg"
-
As you have ordered the oil already I would give it a try. The best way to find out the right damping for the forks is by practise, as it depends a lot of your personal riding style too. If you will find out that the damping is too soft you then might go up.
Standard fork oil has SAE 10 for the Betor legs, a little bit "thicker" and therefore will lead to a slightly stiffer damping. I personal like the softer fork more as for me this set up helps me more while lifting up the front wheel. The "lighter" oil will also make the fork more sensetive which keeps the bike more steady too in my personal experience.
-
Works fine, it depends on your weight too, for my weight, (around 70 - 72kg), with full gear I'am very pleased with this oil.
With more weight you might need a stiffer damped fork and an oil with is less thin like SAE 10. As "thinner" the oil as smoother the damping effect of the fork will be, as "thicker" as stiffer.
The standard oils begin with SAE 5 and goes up to SAE 15, so 7,3 is just in the middle. A good compromise.
-
As Naichuff posted the brake plate on the right side sits straight to the right lower fork leg. Any tolerances will be balanced out by the bush on the left side. Be sure that the bush on the left side of the bike runs free and is not fastend by the bolts on the left lower fork tube.
I had an little issue with the bush while mounting the front wheel due to a little metal chip that worked like a choke and so jammed necessary movement.
-
As my post #19 is a ultra short story, You find a little longer one here:
Webermichel
(comes from KTM's homecountry as riding a big bore two stroke KTM by myself).
To the Maico, does the bike share some spec's/technic with the Bundeswehr Maicos back then?
-
Mmmh .... no
They used their own engine parts, actually the biggest bottom and crank they could find
which would be from a 400 or 440 cc engine and combined this with the cylinder from the
250cc.
In the mid 70's KTM thaught as many factorys back then trials bike will sell easy
in the next couple of years, and first ratings of the importers and dealers gave
4-digit numbers they could probably sell. So they started the project. Just when
all the prototype job was over and Walter Luft and Krahnstöver had made their job
in developing the bike the predicted numbers where only three digits just under thousend.
KTM then abdonade any further production plans abruptly, (they just had annouced the
bike to pubilc) but withdraw the bike from the big German bikeshow IFMA.
Here the bike:
To the Maico bike: (more important!):
Very nice bike and thank's for the pic's with Hans Cramer!
-
The mentioned weight loss is a good idea and will have a lot of effect. Here a comparison what you will loose in
weight between the big flywheel weight of the 350 to the 250cc model:
I personal would only change the right crank weight and try with this, it will change the habit of the engine already a lot. When exchanging the rotor too the engine will get really "snappy".
The use of the smaller flywheel weight was done very often, some former Bultaco riders in Germany even tried to turn them down which is not easy as the flywheel weight is completly hardened. (Anyway I have been told that a weight reduction on the rotor side too will make the bike/engine less useable for trials, I persoanl haven't tried out this).
If you really can't get away from the need of reeds, here some NOS ones from the US E-Bay, (as mentioned there where a lot of Pursangs sold in the US, a complete set up): Bultaco reeds
-
There is a factory that is specialist in hard chroming mechanical parts, they do also stanchions for motorcycles, they will charge you around half of the costs you mentioned in your first post, (with aligning the stanchions if necessary (up to 1/500!) too).
Here the address and pic's of their work: Wissing Hartchrome
I have sended them two pairs of stanchions in the past already and they did a perfect job.
-
I have heard that there where a few Sherpas around, as I remember right, (definitely not sure here), had Paxau once fitted one to an engine?
Fitting reeds to the Bultaco engine would be not allowed in general in Germany or at the Inter Nordic Cup, (Scandinavia). Probably if you build a completly replica bike. If you really want to go with reeds I would try to get the Pursang reed intake and maybe also a cylinder (if possible to loan?) just for blueprinting and determine how the reds should fit best.
The Pursangs had a reed intake, maybe you can find a reed intake in the US:
-
I have followed the discussion also very interested.
I believe, not sure here, the very easygoing rules you have left so much room for interpretation depending the bikes that this new class of modified twinshock bikes just appeard. Once the evolution is present there is no way back.
This was probably encouraged through the fact that monoshock bikes modified to twinshock bikes where allowed.
Then I believe with your higher numbers of riders the competition between the clubs and riders is harder as in my country f. e..
As you have more riders in the hole a second "modded twinshock class" should not be a problem? There is in my personal view one point that has to be solved, a new segregation concept has to be developed between the modified and the standard twinshocks (and between the modified twinshocks to the EVO class too). When this is done you might be out of trouble again.
I understand and esteem every rider that want to keep his bike as original as possible as a contemporary technical machine which includes that he want's to ride sections that will fit to the bike. I have too deep respect for some of the rebuilds that where shown here so far, (I personal would not go as long in every aspect expecially when it is an invention which haven't shown up when the bikes where in regular use), and understand the demand of these builders/riders to take part in a competition.
Anyway my personal opinion is along with our rules we have, just as an example here recorded:
Twinshocks from 1966 and newer:
The bike should be prepared in accordance with the age. Components, with the twin-shock motorcycles are not common and were not possible, should not be used.
The design of frames, front forks, engine, transmission, exhaust systems and wheel hubs must meet the twinshock standards of the trial motorcycles from 1966 (and newer).
The motorcycle must have two spring legs. In each case a shock on the left and right rear wheel, which is supported on the frame and the rear swingarm.
Disc brakes and cooling water are prohibited, as reconstructed monoshock motorcycles.
Further prohibited are:
hydraulically actuated clutches, reed valve two-strokes in, carbon-aluminum and titanium parts for the rear swingarm, frame, frames, axles and tires without tubes.
Exception:
handlebars, levers and attachments or parts have been found earlier for the construction or series of twin-shock motorcycles were series of twin-shock motorcycles were used. (Grandfathering).
Due to the grandfathering rule the TY with reeds is allowed, likewise twinshock bikes that have an aluminium swing arm as standard are allowed. The grandfathering rule is also the "loophole" for any prototype bike that was ridden back then and open also in my personal view a chance for anyone who likes to screw around and to modify his bike as long as this was a clearly contemporary and commen modification, (it should belong to the creator/rider of the modified bike to clearly prove this by evidence whenever in need).
Maybe this helps and enriches the possibilities where to go in the future, to choose the single flowers that suits you best out of the bouqeut of different possibilities is certainly your job.
-
Found it here it is:
And a third pic:
-
There should be a recess for the metal fastener in the chain guard plastic,
the metal fastener should fit in there spot on.
I have seen replica plastic chain guards that doesn't have this recess.
-
The older Bultacos had a bracketmounted to the swing rm, even some for the electric,
from there where a pull switch mounted that was attached to the wire or rod through
a small fastener, as you can see here, (sadly without the switch):
The resistor was placed to the brake light and rear light wiring, (look up position nr. 8):
The original resistor was very archaic build and wil not work if heavy corroded, (mostly the case):
The horn and speedo is here also shown.
Instead of the archaic resistor there was an electronical unit also available that do the same job, (was fittet to the Metralla bikes f.e.), made by Facomsa:
For both types you have to call up vendors if they still have them, in need PM.
The original switch or a contemporary replacement for the handlebar, ... I should have a pic .... ? (Have to through the photo stack).
-
The standard seal slightly greased and the cover shoud fit thight.
You can check your cide case by placing is on a glas plate if the
the side case is only slighly wrapped you can mount a big sheet of
grindpaper for metal with duct tape on the side on the glas surface.
Then you might grind the side case edges with water and rotary movement
to align them again, (this works only if there are one some tenth of mm to align).
Might sometimes be a problem too, (I had this issue), check the drain screw for
the clutch oil, mine must have got a hit from the stones and was slightly bend
so the head of the srew did not seal the drain hole proper.
-
To the fork clamps pinch bolts:
The fork clamps for the 199b allow just one mounting direction as the threads are inside the clamps. My older Sherpa 175cc had allen screws the screw head towards driving direction.
I personal don't like the upper mount of the speedo above the upper fork clamp so much, in my personal view, (taste), the speedo really sits enthroned there. (this is my personal view)
So I will go beside the left side of the right engine mount.
For both posibilities you need a bracket where you can attach the speedo, its just a Z-angled piece of metal with to holes (one for the steering steam and another for the speedo) or a L-shaped metal sheet again with two holes one for the engine mount, the other for th speedo. If you don't get the parts then you have to make your own. Best in my experience is to fabricate a model out of plastic sheet or cardbord first to get the right dimensions. (so did I for the lower mount). Then cut and drill and bend the plate to the spec's or let it be done by a local locksmith. (You need a shorter speedo cable too for mounting the speedo to the left side of the front engine mount.)
speedo drive to the front wheel:
I don't believe there is enough space to fit a mechanical speedo drive, the one for the rear will not fit to the front axle and has the wrong ratio for a 21" wheel too.
-
Yep expecially the Bultaco bikes, sometimes they show up in French Flea-Bay or the French good coin bazar for silly high prices, must be very collectable? I Can't remember the price exactly but it was over 100
-
Yes the oil seals are different, instead of two standard is now one single oil-seal with a double lip and an outer
dust lip mounted. The double mounted oil seals did not last very long in my experience and have a stopp - loss momentum.
The different ones hopfully last longer and have a much less stop - loss momentum as the standard ones,
I additional sat oil-seal grease between the lips of the seal.
To fit the standard dust covers with these oil-seals you have to shave away the lowest lip of the three
inside the outer dust cover, this takes time as you have to be very carefully not to damage
the other two lips of the dustcover. Any damage to these lips will be visible on the stanchions as
the wiping effect will be lowered where they got damaged).
Looks like it should:
-
I believe there is not enough guidance for the speedo cable underneath the bash plate, I would mount an extra bracket/loop just near the swing arm so the speedo cable don't move to much under there. So any movement of the swing arm will not effect the cable so much. further on the cable is "only routed by the upper loop that is mounted near the ignition coil in the front. This set worked fine for me. I found a second pic, that shows the
rear loop just at the end of the bash plate:
In that area I would mount an additional loop/bracket if there isn't mount any.
-
It sound like you still have a Lectron to the bike but parts are broken/unusable and expensive.
In case you are still interested in rebuilding the carb. You can ask Helmut Clasen in Ontario Canada. Helmut is a former ISDT rider and was a lokal Hercules and KTM dealer, he also sold Lectron carbs and has fittet some of his bikes with that carb. He is also very confident about Lectron carbs. You might send him an e-mail depending the parts you need for your carb.
Helmut Clasen have his own web page: Helmut Clasen, his e-mail adress is there mentioned too: (press on the turning @) in case this does not work for you: Helmut Clasen
-
If you want to mount the speedo at the upper "yokes" = forkclamp then you need the speedo mount, this piece works as a washer and will prevent any damage.
If you don't want to mount the speedo up there; instead mount the speedo to left of the front engine mount then you can place a little self made washer between nut and upper fork clamp to prevent damage.
Size of the washer: inner diameter: 25,5mm outer diameter: 40mm, thickness around 2,00 mm aluminium or 1,00 - 1,50 mm stainless steel
would be OK. This is what I did, (sadly no pictures), as I will mount my speedo near the front engine mount.
-
We call it a Nutspanner = noth spanner/tensioner.
Looks like this for example:
Here the page I found the one above on a US page,
(the German tool sites are maybe a little bit confusing),
so you might find something similar in the UK:
www.MotionPro.com
You can use them for some rear shocks too.
-
Still available in Spain through Motos del Abuelo: info(at)motosdelabuelo.com
Their parts inventory you find here: Bultaco parts catalog (It's a PDF, will take time, look up page 16. (2,50
-
Best way to mount the speedo drive is still the rear, for mounting the cable, there should be welded steel ring (loop) near the mount for the side where you have to feed-trough the cable. (I believe that is the one you mentioned already in your posting).
Then there should be a second steel ring (loop) on the right side where the bash plate is mounted where you again should feed-trough the cable, see in the pic:
From then its up to you if you want to mount the speedo on the top of the upper fork clamp or at the left side of the front engine mount. The first solution is much better readable, the seond better hided.
Standard was the top mount, but many riders back then changed the position down to the left of the front engine mount because the speedo was better hided there and this position was standard with the older models up to 1974 I believe so you could simply order the bracket for this mount as a spare part.
For the top yoke nut I take a big ratchet socket for the yoke for the bearings I use a special spanner, you can take a small chisel too, but use it very carefully.
|
|