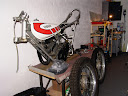
Hello everyone. I've just bought myself an M80 which I am hoping to get sorted so that I can do a few trials this winter. I had a couple of Bultos when I was a keen young lad in the seventies, and have a soft spot for them!
I have been looking at some of the posts to get advice on what to look for and how to sort things. Its been really useful. Clearly some of you guys know your Bultos.
One thing I have not been able to find is how to remove the lower steering head bearing cup. I've tried heating it up and tapping it up the stem but the dust cover is starting to distort and there's no sign of it moving. Any advice? Also any other advice specific to rebuilding this model would be great.
Cheers
Use a good! chisel and carefully drive the chisel in the gap, takes some time and has to be done in small steps all around, this worked for me not leaving any visible marks.
When you have a 2mm gap use a small crowbar for the remaining.
Could be a Sammy miller, tanks setup look's millerish, i think they did their own frames for the little TY back in the day. (I may well have imagined this)
What's the oldschool french TY site called, Majossy?
It's ForumTY, very good, expecially dedicated to the TY, Majesty, Whitehawk and Rayer models.
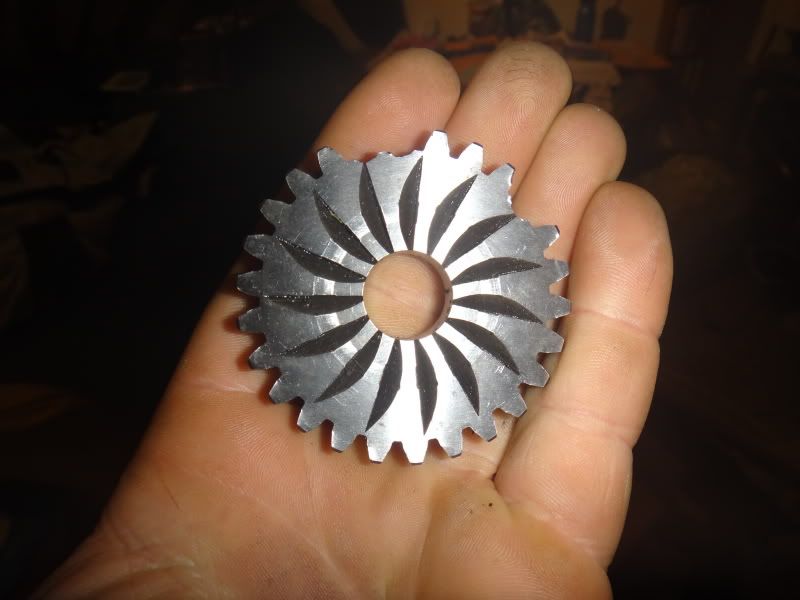
hi all as anybody had the needel roller convertion done on the clutch arm? and what benafits do you get?
Yep have done so, benefit is much less friction to the rocker arm so the complete cluth action is very much improved. Highly recommanded. (With an oil bearing you can also get the construction better protected against water / debris too. I still use a felt washer soaked in oil to fill the gap.)
thanks for the addvice ive managed to get the new dust cover on ok so i might get the bottom race on hopfully without taking any paint off. ive noticed the stem is abit thinner in the middel .and steps out just abit at the top.and bottom think this is so its a tight fit it wasnt easy taking it of anyway ill give it ago thanks again bondy
If you put on some grease for rubber on the inside of the dust cover they will get mounted very easy and you can get them off with ease later, (in a couple of years or so), too. Without they can stick very well and it can be difficult to get them demounted. Don't use normal grease this can in the long run harm the rubber or transform to a "glue" so they stick better).
Grease nipples for the rocker bushing will only work if you have grooves in the bushing that will give the grease the possibility getting around. The Italjet Piumas had brass bushings too and had grease nipples and these grooves inside, looking like a horizontal eight that is wrapped so both ends are connected together.
If you just drill a hole an mount a grease nipple the grease will rather come out to the sides (shorter distance) the reach the opposite side of the bushing. (If the rocker would rotate 360
cheers mate, hope your ty 250 turns out as you imagined it, its great fun doing up old bikes, i've had at least 500 views but only 3 replys, what a bunch of ****ers
Not only to get up the numbers of replys, a really very nice work, my next project is a TY too, still working here and there whenever there is some sparetime on the other bike but then this one:
will get a rebuild too.
You changed the rear rim too as I see. Did you do any modifications to the engine?
It's nice, in it's overall layout it shares a lot or maybe too much with the other competitors but also having some own technical details. It's not something redical new in frame and engine development like the OSSA. It does not have a real own identity from distance.
- the protection of the front sprocket is poor.
+ detachable footrest very nice.
0 front looks familiar.
0 frame a little bit beta with more angularly touch.
? rear shock, this works already proven by BMW, but the open clamping area is a littly bit scary in my personal view (--).
? rear axle adjustment from MX, why not, reminds me to my KTM (from 1989! pretty much the same)
? very very low mid section
In our world where personality and outward appearances is sadly overrated towards personal qualities not a hitter. But I'am looking forward to the first ride tests just to revise my given statements completly.
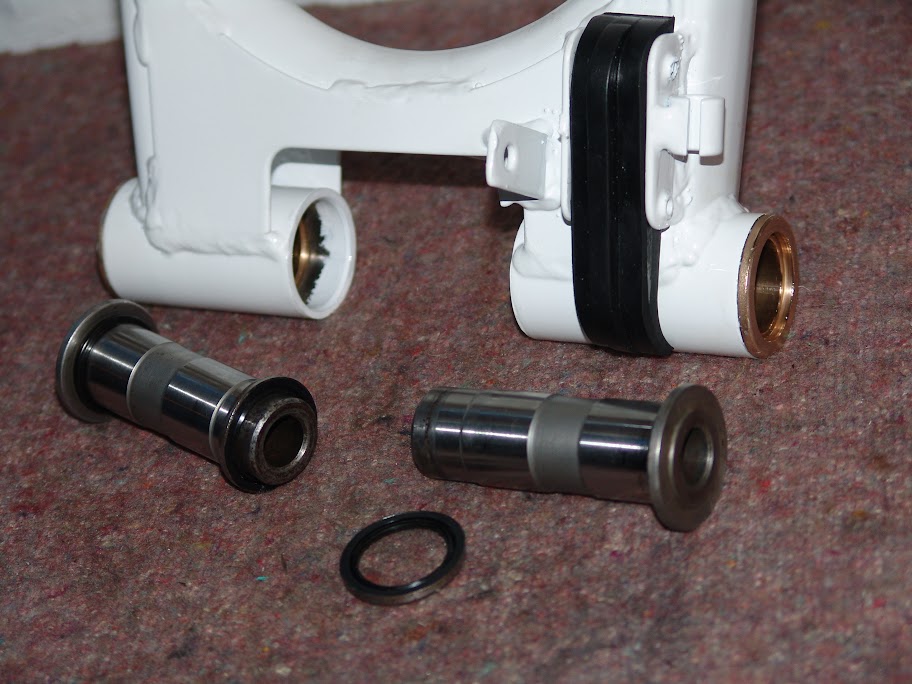
hi all ive just had my yoks powder coated dose anybody have any ideas on how to tighten it with out risk of damageing the paint? i no the nut as groovs in it for a c spanner but theres not enough space to get a c spanner in. so i got a normal nut of bultaco uk but im still dont want to damage the paint. allso how tight should this be? cheers bondy
Make your own little washer, around 2 - 2,5mm thick out of aluminium and then the problem is solved.
Aahh .. Yokes are triple clamps, this explaines much for me.
Yes these clamps can have a big effect to the steering as on trials bikes the distance between lower fork clamp (yoke) and upper fork clamp (yoke) are mostly differnt to the steering head axis. The upper clamp is a little bit further away to the center of the steering had then the lower one. This will result in a steeper fork angle and improve the understeer. This is a little bit visible in the parts book of the Montesa 200.
To the forks itself, I had two Italjet Piuma's back in the eighties, the first bike had Betor forks which worked very well, (coming from Bultaco). The second bike came with Marzocchi's mounted, there where no big differences as I remember only that it took much longer until they where breaked in, (The fork had a some stop - loss or breakaway torque when new).
Thank you for the explanation of the tiller effect the sailboat comparison was already very easy to catch, (the half of my familiy are going to sea, I work on land but doing sailing already as a small kid).
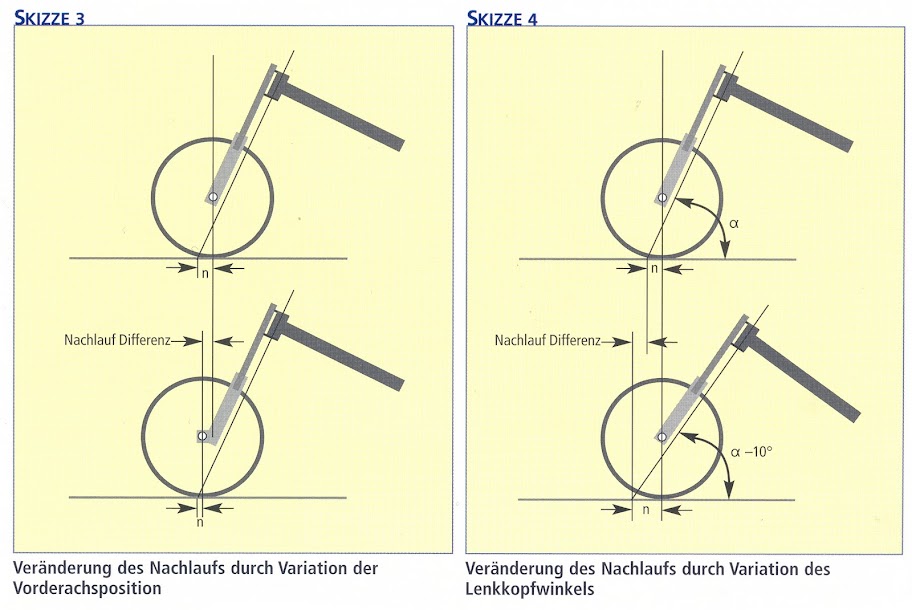
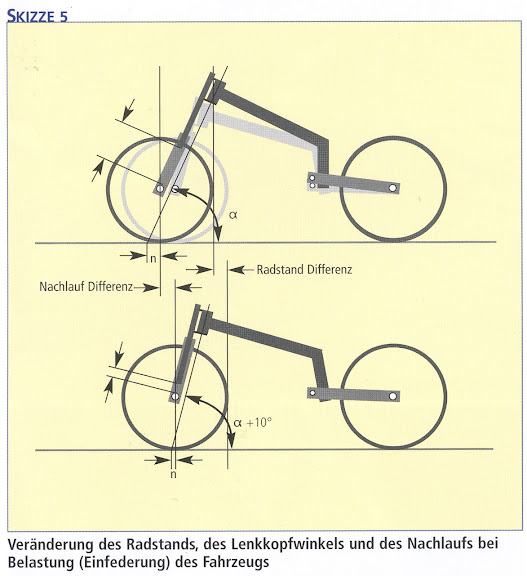
To the position of the handlebar to the axis of the headtube or the fork axis, this can be in my personal experience much better changed by the position of the handlebar. Maybe I'am not sensetiv enough to feel a big difference, if I turn to the right I move the lever in the right direction and it works very well . The main point in my view is to have as less overrun (Nachlauf in German or may be after run in English?).
My doubs I have when the frontaxle is positioned in axis of the fork, that this position eliminates one of the big evolution steps in trials or bikes technical improvements: the shiftet position of the front axle. This reduce the overrun or afterrun (Nachlauf) and as less "Nachlauf" you have as handier is steering overal which is essential in trials IMHO.
I don't know if I have used the right word, here a pic:
Pic 3 variation of n due to the position of the front axle,
Pic 4 variation of n due to the angleof the axsis of the headtube or fork.
How n is changing due to the effect of a compressed fork:
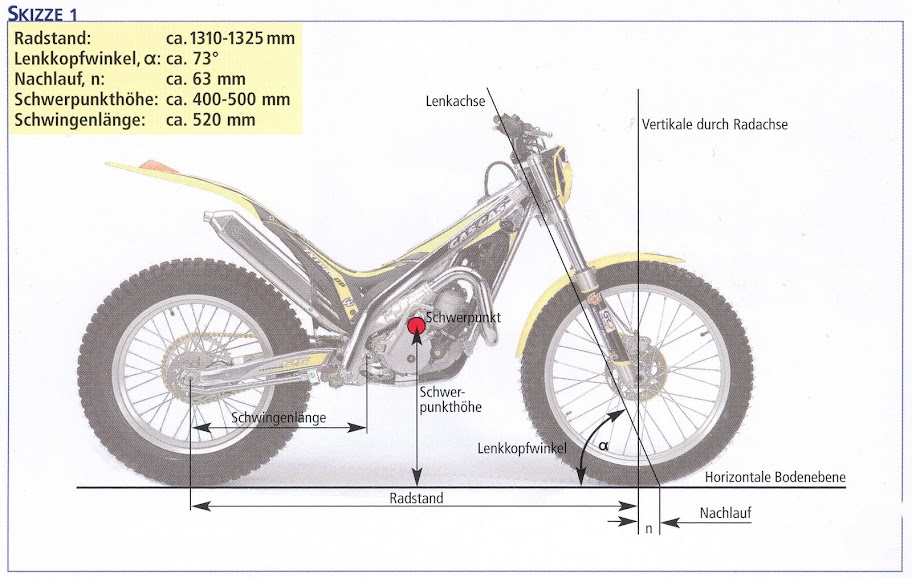
Standard diamentions of a gasser:
I believe that maybe the steering of oldfanatic's Bulto might feel so bad because the fork doesn't respond so well anymore while turning. The terrain is rarly flat while turning and every small stone or pit that is not smoothed out by the forks suspension makes steering uncomfortable. There might be some different reasons for bad fork action:
The fork just sits a little bit upthight in the clamps,
The fork stanchions might be just a little bit bent, (a differenc of 2 - 3mm is not detectable by normal view, only if you deassamble the stanchions, but can worsen fork action).
The lower forktubes might be weard out, sadly the stanchions are guided in the alloy lower forktubes without replaceable bushings, with the time, these lower fork tubes wear out and the cylinder hole inside them begin to get an slightly oval shape.
And probably stiffend oil seals.
Maybe just a really good and complete fork overhaul will fix the problem, nothing is build to last and work perfect up to the end of the world.
I don't really know what tiller effect* means, does it mean that the fork action is not smooth and more stuckering expecially in turns with additional fork action downwards or upwards or while breaking riding down a hill?
And once again I must admit that my english ... is somehow limited.
(BTW: tiller effect on www.dict.cc puts out the German word Ackerfr
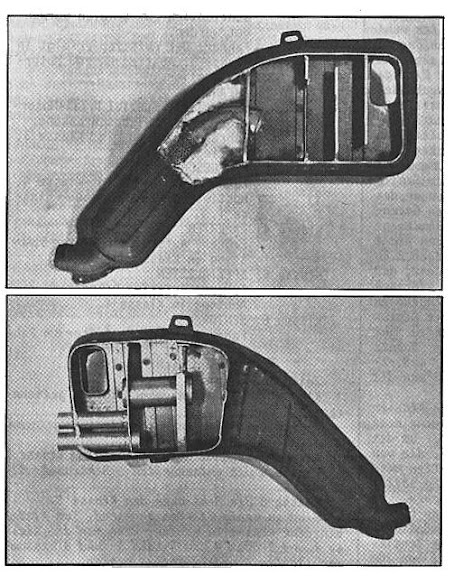
The "mid-section" of the exhaust, mmh ... as I have seen from the inside there is just a hole tube with insulation inside the "mid-section", the diameter is a little bit smaller as the manifold, so it's just an absorber, reducing the noise and the speed of the exhaust gas flow, like a diffusor for a classical 2-stroke exhaust.
The gas fumes will then go further in the "rear section" of the exhaust system where there is again a hole tube with insulation slowing down the gas speed.
Then starting whith the boardening of the club-foot design of the rear exhaust comes a plate or "plate-wall" closing the opening but with a small opening where the exhaust fumes have to go through, while also beeing reflected in the opposite direction. The reflected gas will recharge the pistonchamber with unburned gas-air mixture from the exhaust side which have in the meantime got out the outlet port due to the flushing loss.
Then follows some chambers that are connected again by small openings or tubes leading the exhaust gases through the muffler. This system of tubes and chambers works as an Helmholts resistor in physical terms. The resistor is again for slowing down the exhaust gas speed and noise.
If you will do any change to the mid section you have to mdify the rear section of exhaust too, both parts depend on each other.
There are some very good articles that where published in the German Trialsport magazine in the begining 80's about these exhaust systems, how they work and how to set them up if you are interested PM, (warning contains a lot of formulars). I personal have got through them too, but decided the effort would not be worth my riding skills.
You can minimze the Helmholtz resistor system a little bit at the end section (only the outer side!) which will result in a better air flow (= more engine live/response) but you have to compensate it with an adiitional absorber to get the noise as low as before.
To the Reg May modifications to the swing arm you can look up here: works Bultaco
Here a cut through the rear part of the silencer:
The lower picture shows the outer side where changes can result to a positiv effect if you know what you are doing, (just calculating might not result in a positiv effect you need experience too.)
Maybe some other user might post more useful information, anyway this is an very interesting topic!
: hello guys i have a 350 sherpa with a bing carb ,it has a pilot jet 35 was wondering if a 40 jet would improve the bike .the air screw is only 3/4 of a turn open and the plug tends to become black easily ,wondered what jets you guys are using ,also put in electronic ignition and the difference in pickup is unbelievable regards mur
Fitted with Bing a 40 pilot jet is standard for model 199-A, should improve the response
if you live and ride in normal altitude.
The 3/4 of a turn open is the standard position of the air screw a good position to sttart for further fine adjusting.
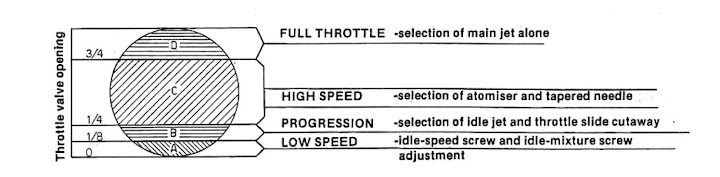
For getting an clue where there might be a jetting issue or some adjustment needed here is a drawing that shows wich component is responsible for the gas-air mixture at different throttle positions.
You can mark them to your throttle grip for fine adjusting of the carb, like shown here.
Take a light sloping road, around 600m at just ride up with constant throttle position, if the engine is running like a four stroke than he runs too fat/rich, on the other hand if the engine is pinging, it's to lean, (If your hear the motor pinging abort further riding / change throttle position, (running the engine too lean is unhealthy for the engine).
just thought i would share this with you all, i have had to make it a poor copy as it was to big for youtube but i hope you like
Very cool, :thumbup:
thank you very very much for this very british footage. Expecially the naming and the short driving scene with the German rider Helmut Stanik is in my personal view a highlight for me.
In my very active day's in the 80's Helmut was my local hero. I have learned some good tricky riding stuff from him and remembering very well when we where wrenching on my bike at his shop in Bramsche. Back then Helmut had a trials bike store too, my last two bikes I bought from him. He's a really nice guy and was a very good rider too.
HI guys ive just got a new bash plate from todo trials in spain im having troubel putint it on the engin is in ive tryed it on a spare frame and it gose on just have to pull it abit with a driver throw the holes. i spoke to dave from bultaco uk he said they can be a buger to get on. and he allso said undo the bolts that hold the engin. i think this may be the problem theres abit of play before everythings tightend up to allow you to get the plate on i think this is my problem you agree?
Yep!
In my personal experience with bash plates that are an integral part of the frame this is the way to do.
If You ever do a complete rebuild and want to remount the engine to the frame (where the bash plate is a bearing part of the frame), make sure you have mounted the bash plate first, (just mounted, the bolts are mounted but not thigtened). Thgis makes the assambly much easier.
One thing to note as your bike (model 199a) have the "weak/thingy" headsteady, please make sure that the headstady is mounted without any stress/force!
The headstady has to fit on spot and the bolt to the frame has to be thigtened at last, (which may result in unthigtening the cylinder head too if the hole of the headstady will not match to the bolt hole for the frame!)
Doing so you will avoid any overstress to the headstadyplate.
hi all ive been trying to buy a affter market bash plate for my 199A from todotrials but i cant seem to order one. ive filled the details in but i jus keep getting some message about shipping not got a clu must be a easy way?


 :thumbup:
oil leak
in Bultaco
Posted
??? as you did replace the oil seal on the clutch side as I understood. So this axis of different shafts should be OK
If you haven't made a mistake replacing the oil seal of the clutch shaft there should not get out any oil at #01.
How thight is the shaft of the gear lever, #02? this shaft goes through the gear-box and the clutch?
Last not least how thight is the shaft of the gear actuator or the cover #03?