just thought i would share this with you all, i have had to make it a poor copy as it was to big for youtube but i hope you like
Very cool, :thumbup:
thank you very very much for this very british footage. Expecially the naming and the short driving scene with the German rider Helmut Stanik is in my personal view a highlight for me.
In my very active day's in the 80's Helmut was my local hero. I have learned some good tricky riding stuff from him and remembering very well when we where wrenching on my bike at his shop in Bramsche. Back then Helmut had a trials bike store too, my last two bikes I bought from him. He's a really nice guy and was a very good rider too.
HI guys ive just got a new bash plate from todo trials in spain im having troubel putint it on the engin is in ive tryed it on a spare frame and it gose on just have to pull it abit with a driver throw the holes. i spoke to dave from bultaco uk he said they can be a buger to get on. and he allso said undo the bolts that hold the engin. i think this may be the problem theres abit of play before everythings tightend up to allow you to get the plate on i think this is my problem you agree?
Yep!
In my personal experience with bash plates that are an integral part of the frame this is the way to do.
If You ever do a complete rebuild and want to remount the engine to the frame (where the bash plate is a bearing part of the frame), make sure you have mounted the bash plate first, (just mounted, the bolts are mounted but not thigtened). Thgis makes the assambly much easier.
One thing to note as your bike (model 199a) have the "weak/thingy" headsteady, please make sure that the headstady is mounted without any stress/force!
The headstady has to fit on spot and the bolt to the frame has to be thigtened at last, (which may result in unthigtening the cylinder head too if the hole of the headstady will not match to the bolt hole for the frame!)
Doing so you will avoid any overstress to the headstadyplate.
hi all ive been trying to buy a affter market bash plate for my 199A from todotrials but i cant seem to order one. ive filled the details in but i jus keep getting some message about shipping not got a clu must be a easy way?
Fitted my kickstart return spring today, and proceeded to start the bike. Fired up after a few kicks, but I kept hitting the footpeg with my heel despite trying a few locations for the kickstart lever. I've got it mounted so that it starts to turn the engine at 12 o'clock, but it seems to want to continue past the footpeg (at about 4 o'clock) down to almost vertically down. Is this normal? Are my feet just too big, or it it just my technique?
Also, it seemed like when I was turning it over, I would get one good kick which was turning the engine, then one "quiet" kick - is it the case that I'm kicking it through the expansion part of the stroke every other kick?
I have my kicker around 10:30 which works fine for starting and riding too.
You might hit the footpeg with your kicker that is a goemetrical fact.
To mount the kicker at noon is a little bit too far back and starting might
get not so easy.
(For starting I turm the handlebar to the right, then search befor OT
place the left feet, knee bent and sit down, (best way to start IMHO),
got her running art least at second kick).
The "quite" kick must be when the piston is getting from downwards to upwards I believe,
hi all ive had the clutch basket off my 199A to check the seal. and notice the was some play in the shaft back. and forth is this normal? clutch oil as been getin throw to the gear box allso the crank seal plate as asmall pice missing on the outer side in the inside were the seal seats may be geting throw there ive checkt the gear shifter seal looks lick its not worn but is verry slight movment on the o ring anybody any ideas? allso i took the gear leaver shaft out to check the o ring i put it back on whent on ok i just want to know will this be ok?
A little bit play back and forth is OK and should be. Any play to the side would be bad, when you have deassambled the oil seal you can better detect if the bearing runs "rough" or if there is any "play" to the sides which I do not belive. The bearing runs in gearbox oil there is rarly an issue there if the oil was changed reagulary.
thanks i dont want to split the crank case if idont have to im just gonner change the seal allso why ill have the cltuch basket off ill change the seal on the other side i did notic there was a slight pice missing on the seal plat i have spare one so ill ghange it i have a conplete spare engin witch is all in bits the crank case is slpit got the inners in tins im thinking of puting it together be next year or i might just send it to bultaco uk and let them rebuild it ive got frame and wheels and forks so might make number three
Oh this sounds interesting so you have three Bultacos, that is nearly a flock.
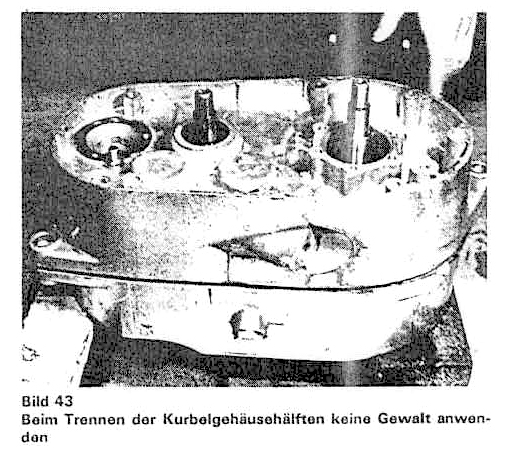
If you want to split the cases, get a workshop manual, there it's written up how to do. But as already stated it should only be done if you really need it. It has a reason why Bultaco has placed all the bearings to the gearbox and the crankshaft seals on the outside of the case. They just fail more often then the inner parts. Already when not heating up the cases the right way when splitting or remounting the cases can get you in trouble.
Remember:
You said beside the issues the engine is running great in your former postings, so why change a running system?
I personal would not split the engine cases if not really needed, this takes much time and effort and the possibility to do it the wrong way if you are not used to it is very high.
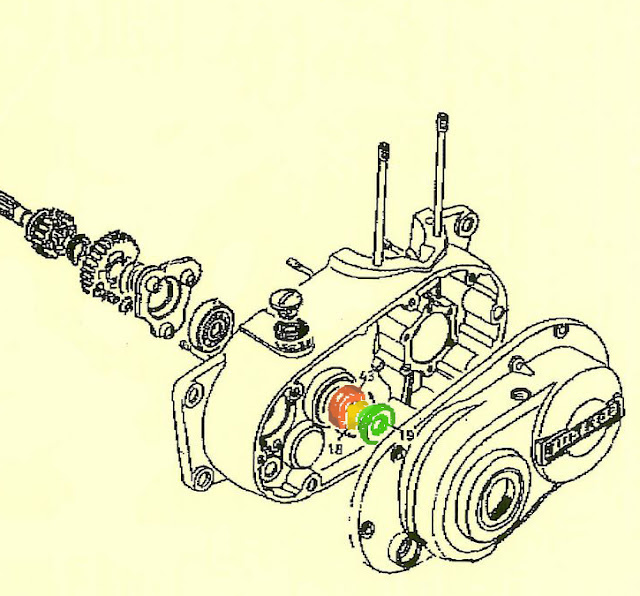
Here a drawing and some the photos where the oil seal is located:
The red piece is the oil-seal, #43,
the orange part is the o-ring, #18,
the green piece is the distance bush, #19:
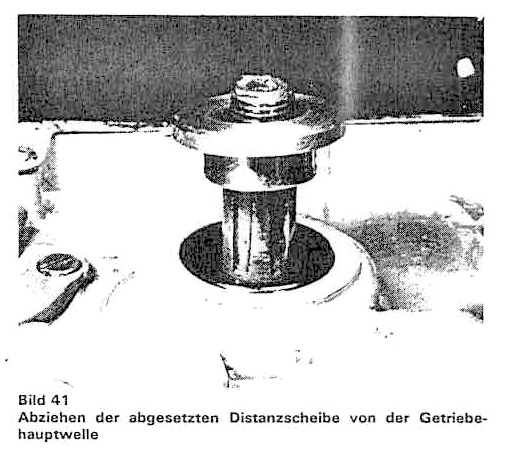
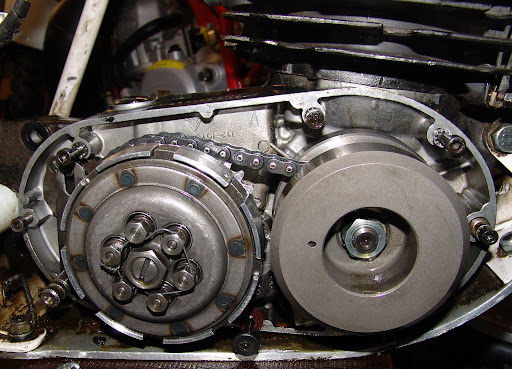
How it looks with unmounted clutch and primary chain and flywheel:
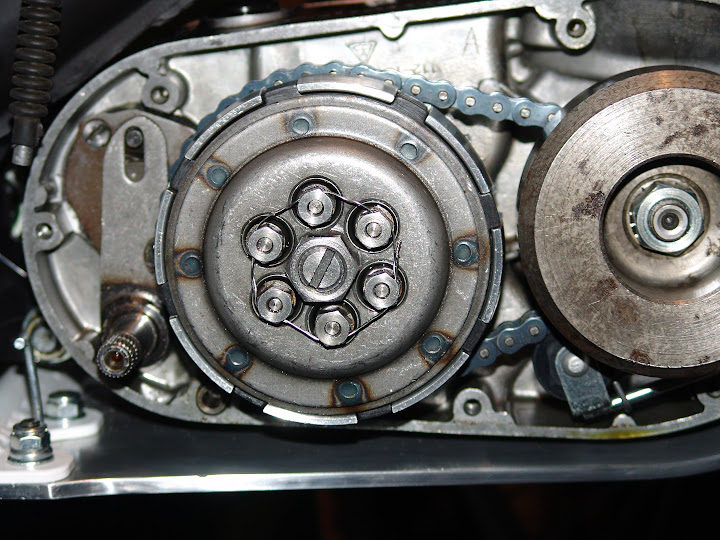
A close up of the bearing and the distance bush, the o-ring is sadly not seen the photo is a little bit fuzzy:
hi ive got wire for the clutch plats would it be ok for the nut on the weight if i
doubbeld it? allso the nuts on the clutch your are on the end. ive got new fiber plats in mine i had to take mine in about four threds is this ok? the clutch was fine no drag and neutral was easy to get whent it was running
Here a pic from the manual, as you see they did not use very special or thick material either.
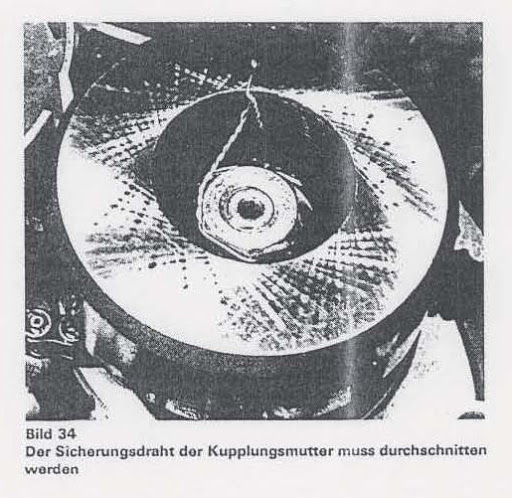
I dom't had any hole in the nut to safty or lock wire the flywheel weight. Here a pic when I took the clutch cover away. When I got the bike the seller stated he never wrenched on the bike, because he has two left hands when it comes to technical maintance. (which must have been true, every bolt and nut was original and untouched.).
The original wiring of the clutch wasn't very aesthetic or in any systematical order.
I wrapped the end of the wires after drilling a little bit around the second wire just to get sure it will not move due to centrifugal force.
The wire just holds the nut in place nothing more, if it is made out of stainless steal, St 1.4571 of V4A, the strengh should be around 600N/mm
hi ive just put a new primary chain on whats the best wire to use for the wight nut? ive got thin locking wire for the clutch. but thats to thin. the wire i took off was thicker ive got some garden wire witch is gavanisd i tryd it today but it snap when i was twistin itny addvice would be greatfull
As you have already found out any garden wire stuff has not the right strength and flexibility you will need. I take safty wire from KTM but I think every stainless steel safty wire will work.
To the thickness of the wire and the clutch:
I used one wire and leaded it through the holes of the nuts just two times to be safty the nuts will not turn around.
That your spring does not have the right tension to move the kick start foreward sounds strange.
It is nearly impossilbe to mount the spring the wrong way.
When You have mounted the front end pin of the spring in the hole of the kick-start shaft the other end of the spring should unmounted point at 5'o or 6'o clock. When mounting the rear end you tense the spring.
May be the ends of the spring had not the right angle between them, may be the tension of the spring isn't good enough.
BTW.
Due to the bending getting the spring inside the hole it is recommended not to use the spring after remounting again. (to cold deform spring steel isn't a really good for the material property).
hi guys does anybody know where i can get the front sprocket seal for my 199A? ive tryed the ones bultaco uk sell and its still leaking. any ideas where to get the seal with the metal clad round the ruber? i found one in a tin of engin parts i have ive put it in seems to be a much tighter fit than the all ruber ones wont know till ive put the clutch back on and start her up to see if shes leaking. ive turned the back weel round now before oil used to drip out dosant seem to be doing it with the metel seal so any help would be great
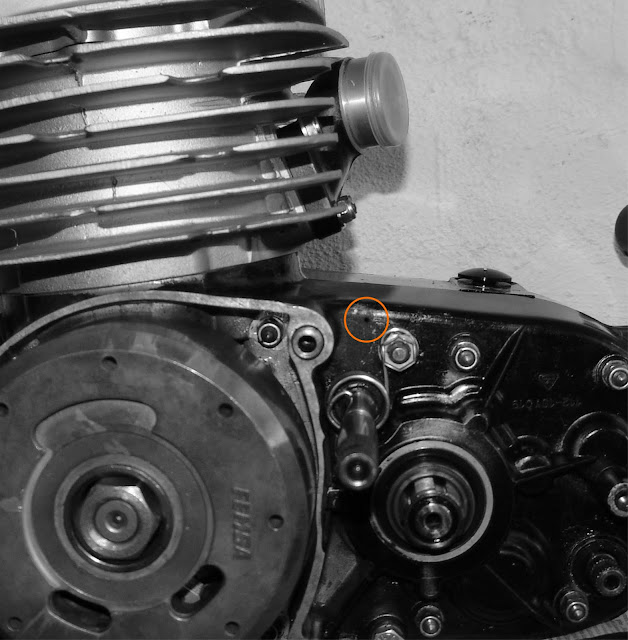
Often the front sprocket seal is leaking because the tiny ventilation hole for the gear box is clogged with debris.
Befor you do another replacement, please look after if the tiny hole in your engine located in the center of the red circle in picture is free.
If not the warm gearbox oil and the reminding air inside produce a over pressure.
hi yes new clutch has been fitted is it worth me buying a new chain? how do i fit the chain dose it just go over the to spockets? theres no split link? is that why they clutch basket.and weight have to go on at the same time? allso is it worth changing any seals why ive got this off?
If the chain shows excessiv wear then replace it.
You can replace the crank shaft seal underneath
the flywheel weight if the seal is already some
years old.
To replace the chain you have to deassanble the
flywheel and the clutch together with the
chain at once.
The chain is endless there is no chain link mounted


 :thumbup:


199A alloy tank
in Bultaco
Posted
Powder coating a gas tank is beyond the good manners I guess.
The tank of a bike is well let's call it the face of a nice girl.
Hopefully that statement and the one to come will not get me in any trouble).(
Only very little make-up can improve the appearance but putty is the opposite.