| |
-
One should in life to learn something new every day, I think this is very important. I really do not respond to postings demotivating but today I'm doing it for my knowledge of the English language and to improve my conversation skills. I'am still learning here! Otherwise I ignore such demotivational posters for them I have lack of time.
Do you see the underside of the mounting screw from the fuel valve on the fuel tank? Probably not, unless you crawl around in the grass and look on it from the dog's perspective.
I have not written that the tank should be wrapped with the foil, because of me that can be made by Christo Vladimirov Javacheff. I would just place it where the bubbles occurred which only can be at the bottom of the fuel tanks for geometric reasons of the location of the exhaust.
Gasoline is highly flammable when strikes blow (for whatever reason) the color from the petrol tank for heat reasons would I (if only for purely health reasons) think about it.
@Nigel Dabster:
Again a day where i hopefully made some little improvments in English conversation,
I know I am far away of beeing good.
BTW. just now the rain stopped here and the sun broke through.
Have a nice day!
-
I do it like this:
First unscrew the securety nut made out of plate,
Second unscrew the second nut that holds the spring.
Third I unhook the spring from the bolt using a self made spring puller which I have made out of an spoke.
Now the spring is loose and it is now easier to hang out the spring from the kick starter shaft
done, (fourth).
The reassembling is visa versa.
-
I also have some doubt's about the new fuel "blending" and therefor
switched to a derivative fuel.
I came to this fuel from working with my clearing saw and chain saw.
The gasoline is based on alcylat there is no ethanol in the fuel.
Best thing is you can store it in years, is burns with less carbonate,
don't harm plastic or alloy parts and does not smoke.
It does cost more then normal gasoline but how much gas do you need
for a trials machine..., and you can put in in your chain saw,
lawn mower, ... too.
The normal Aspen gasoline fuel you get have only 95 Oktan,
the gasoline for motorcycles is called Aspen+ has arpond 98 oktan,
(you will have to rjet your carb with normal Aspen or Aspen+)
I take AspenR wich has 102 oktan and you can fill it everywhere without
any jetting changes or thingking about if it has the right oktan number ...
It works for my bikes: Bultaco, KTM, Yamaha,
chain saw and clearing saw, both Husqvarna,
lawn mover: with Briggs and Stratton engine
Information:
AspenR
Aspen+
-
You may ask Orlano Calonder in Switzerland, (former Bultaco importer that still have a lot of parts even for any Bultacos of the 60's). Probably not the cheapest, but we are talking about parts that are rare so price is not the first matter here.
Oralndo Calonder SA
Anothere ressource might be Romeromotos in Spain:
Romeromotos
(But these guys only talk Spanish or Katalan!)
-
Never heard of any powdercoated gastanks this is a classical paint job IMHO, but why not, you can give it a try?? (But to get any decals under a second clear coat of paint will be dificult I believe???)
If a powdercoating is more heat durable then a good paint job, I am not sure. If you have any heat issues, (Haven't had this problem so far), then try heat reflecting self adhesive foil at places where you had that issue. I have done this to my sidepanels and airbox of my enduro bike. This protects very good against heat.
You find this foil here for example: heat protection foil
Looking like this:
-
A body shop sounds good, they should have experience with welding alloy, I gave my dented MX pipe to my local body shop and they where able to get them out they are real plate wizards.
I don't have any experience with Bultaco alloy gas tanks, on my MX bike I use aluminum foil heat-protection for the back of the sidepaneels where the exhaust goes along. This works very good, the foil is self-adhesive. The foil protects the plastic very good, (my MX bike is an old girl and the plastic sidepanels are not availabe any more to this model). But this might not look so nice on a Sherpa?
Here is the ressource in Germany: heat protection foil
You might try out heat tape, which you can get in different colors too, this works also very good. You need zip ties to to get them mounted. The manifold of the Sherpa is at the point along the fuel tank at it's highest point so it won't get to dirty there, this might be also a sultion to prevent heat damage to the gas tank.
Ressource sadly in Germany again: heat tape
Patrik
-
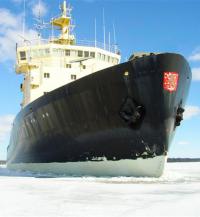
A 199B same displacement, rebuild still going on, the bike had stood around 15-20 years
forgotten in a garage. They could not tell me for how long time. "It always stood there
as I could remember" was the answer from the seller when I asked.
-
Here is an adress where you can get this pait in the UK:
pedparts.co.uk
Maybe there are other places where you can get it for a cheaper price, I would try to use google in your country.
-
-
The gastank is a little bit grainy, but only a little bit, you can compare it to older bumpers when painting these where not in fashion like nowadays, (the main difference is the plastic, the bumpers are made out of harder plastic, (PP or PVC), the Bultaco gas tank material is very soft, I believe it's made out of PE-HD, like the airbox too, (PE-HD is oil and gasoline resistant)).
After some use the surface of the tank gets a little bit grey, this comes from cleaning the
tank with rugs an cleaning solvents and look like this, the greyish color comes from micro scratches
on the above located surface, the "lower" situated surface is still ok and so the blue is still visible.
As I mentioned already in my first post a photo of the tank would be nice to look up what is the best procedure to solve this problem, we don't have any so we have to guess.
Nevertheless the grained surface is very smooth, the "modulation" might be 200 - 400My, (0,2 - 0,4mm) as already stated with the fine sanding you can get the surface clean and when beginning with fine sandpaper the hopefully clean (*) lower surface will remain. If the tank more scratched or white then use a eccentric sander, beginning with 150 grain then 240 grain, you simply align the surface. then follow as mentioned befor.
Best way is to make some small test where you later not see your try out, like the surface under the seat.
If I have enough spatretime, whichever is rarely, I can show it.
I still have the old gastank of my bike laying around in the garage, (production year of the gastank is 1978! but was fitted to a 199b), the bottom filled with gas gum, plastic penetrated with premix, paint showing bubbles, ...), I can make a quick show and tell if someone is interested.
-
This sounds interesting,
I have heard about a simmilar process called "Fluorination Barrier Treatment" but with different indigrents, that is used for plastic containers, but only available in the U.S. so far as I know:
Flouroseal
There where already some gas tanks prepared with this treatment with good results. The treatment was done for old KTM bikes from the 80's to 90's, they have this bright white gas tanks that very fast get colored by UV and premix gas vapors, looking "not so good".
A big pitty is the "coloration" from the gas vapors because it's not only on the surface it discolors the complete material. Gas tank with coloration from premix:
I was therefore a little bit suspicious about doing a paint job to a used tank, when there is discoloring also inside the plastic material there should be oil components also inside, this can effect the adhesion of the paint. I found an never used gas tank for my KTM but it was shaded by UV light and had a light brown-yellow coloring. Luckily only one the surface.
Because I did not want to paint the tank I used the preparation with cleaning, sanding and polishing already posted before. Here a pic after I had done one side without the last polishing, (a 4h job so far):
Mounted:
The result is very OK I think, (By the way the sidepanels got the same treatement). Here another picture with the already done gastank and the radiator shroud where I haven't done any surface refurbish so far, (pic was made for getting replica decals done for the bike, these shown there are samples/try outs and the smaller one's are not the right ones too as I figured out later):
Back to the Bultaco:
I just repaired the airbox of my Sherpa, glued the cracks:
As you see very scratched, there where some deep scratches also on the sides,
get rid of them with groove sandpaper wet and dry (240):
Then do the sanding over and over again using finer grain:
The differences between 400, 600 and 1200 are not so good visible but you feel it,
here after the polishing, the photo is taken in side light so you can see the surface very well.
-
Very nice restauration, my respect for the reconstruction of this bike.
you did some "improvement/changes" to the original set up, which is up to the owner to do so. In my personal view I would do two things, first mount the speedo again and second try to look up some original fenders - I know they are quite expensive but they would fit very good to the appearance of the motorcycle. The plastic one's you can use for dirt biking / trial riding, the alloy one's for showing up and "getting bagels from the bakery".
I like the gas filler cap, that is a cool one.
Any plans what to do with the bike?
-
To post a procedure that might help without close up picture is difficult.
This might be very small "scrathes" from the snading process, they show up even faster as darker the plastic color is.
There are two possibilities to get rid of them:
1. method:
1. first a polish with brass polish,
2. then again a polish with silver polish.
The basic principle behind this is to substitute deep scratches with shallower and shallower ones, this therefor will only work if you have already used the fine wet and dry sandpaper (1200) befor. Normally starting with 600 then 800 then 1200.
2. method:
If you are really keen in stripping paint with a heat gun, then you can skip 1. and 2. and melt the surface just a litle bit but this works only if you are really very very keen, (I personal had so far only good results with this procedere with smaller parts, so I have to take the elbow grease method).
Just to note there should be no gas in the tank and the tank have been vented for at leat 24 hours storing him upside down with open gas tap!
If the tank is discolored by sunlight or gas then this method will not help completly, discolering from gas is inside the plastic and discolering through UV you will find also som My inside.
-
Update airbox crack repair:
I tried this Henkel Terokal stuff out, used it on a it on s smaller crack at the rear top of my airbox.
It worked very good, very important is grinding the surfaces of th plastic with wet amd dry sandpaper
(150 or lower) and to clean the surface very well using aceton or thinner. The primer that have to be
applied too has to dry on the surface, which does take half an hour.
Here is the first glued an filled crack after align with sandpaper:
After this good result I know went further to the cracks that are around the upper front mounting of the airbox, again drilled a hole at the end of the crack and widened them, afterwards the where grinded and cleaned with aceton and thinner, here after applieing the primer and waiting for getting dry:
This PU stuff looks like poop, luckily it does not smell likewise, (it does not smell at all, very disturbing), here after application:
At least I'am very impressed, I will therefor try out this stuff at my helpless cracked chainguard too:
Probably someone is intrested in the result.
-
It depends on the depth of scratches which technique to use.
Deep scratches:
1. Start off with "Wet & Dry" paper (grade 600) using water with a little bit of soap as a lubricant.
(The water is essential to keep the paper grains free.) Gently "grind" away at the area until you
cannot see the original scratches. (The area will go like frosted glass, but don't worry at this just yet!);
2. Change grade of Wet & Dry to 800 and do the same;
3. Change to grade 1200 wet & dry. do same grinding... (The basic principle behind this
is to substitute deep scratches with shallower and shallower ones.);
4. Once you have got through the 1200 grade process, thoroughly clean &dry the area;
5. Use "Duraglit" or "Brasso" BRASS polish to remove the "frosted" effect;
6. Once this looks nice and shiny, use a SILVER polish to give a final finish.
For fine scratches, start at 4) above.
This takes time, you cannot rush it. Even when you think the scratches have gone,
give the process a bit longer. There are NO short cuts to polishing.
(You can also use these plastic polish stuff in step 6 but these polish tubes or
bottles are very expensive, a brass and a silver polish do the work too.)
Do Step 1 to 4 only at and around the scratched areas this will save some time.
-
I'am very sorry to tell you that it will not work with rattle can paint. Even with a perfect paint job done with 2-compound PU paint it will not work.
Every time the fender will be considerable bend the paintlayer on the plastic will be compressed or stretched
if it is only a little bit no problem, but when happening after a "back flip", ... no chance, the overstressed paint layer will chip of or get crinkly. This will turn your fender in a more "ugly" status as it is now.
Best way to cure scratched plastic is first to plane ridges away with a cutterblade, then use grinding paper 600 to 1200, (sand with using water!), to sand the surfaces. After that treatment polish the platic, this will look much better in the long run.
-
Had the same problem too, you may ask www.bultacouk.com in your home country if they have any replacement,
(I think they might have). If not you can get replicas out of fiber from Orlando Calonder in Switzerland.
(www.orlandocalondersa.com)
My airbox have cracks too, here both of them the original on the left side, the replica on the right:
You have to drill the holes for the fasteners and the sidepanel by your own, even the hole for the airbox cover
has to be recutted, but then you can be sure it will fit. The airbox cover is from a 199b model but he has
replikas of the other models too.
I know it might sound silly, but I will give a repair of the original airbox a try, after reading this book:
Motorrad restaurieren von A bis Z sadly in German)
The autor has found a plastic repair set from Henkel here in Germany that can repair all sort of plastic cracks.
The repair set is no bargain but workes perfect. It's based on a two Compound mastix that you can use as a glue and filler,
then you need a special primer. You can even remount broken plastic brackets that suppose to hold side panels or likewise,
He states and shows that this stuff is very strong,(stronger than most plastic materials that where used originally).
Glue and Filler: Terokal 9225
Primer: Terokal 150
mix pistol: Teromix 6700
I haven't used it until know, because there are some other pieces for other restaurations/rebuilds going on where
I want to repair plastics too, cause of the cost of this stuff I will repair all of them at once.
I have already used Henkel products like Loctite 3463, (steel filled metal knead that is as strong as normal steel),
that showed very good results.
May be there are some other british brands that work too ?
-
Befor the guessing here starts, my 0,02
-
If I would be in your situation I would opt which suits best my riding style and which I know best in technical matter.
If I ask the Fantic guys here in Germany they all state that there is no big problem getting parts, likewise Yamahe, Montesa, Bultaco and even OSSA last but not least even SWM or early Betas.
As long as you don't seriously want to ride a Merlin or a Trans Ama the part situation is not helpless if part of the game is a little research here and there.
Good luck in the election.
-
Got the brake unit back, that cure worked very well.
The chalk contact pattern that was visible is now milled away. (The brake was centered to the axle while milling). It works perfect now.
Thanks again.
-
Good idea,
I have phoned with my lokal KTM shop here in northern Germany they will mount the complete brake (backing plate with assembled shoes) on a mill and then align the brake linings. I send them the brake unit by post wednesday. When I pick the brake up on saturday it will cost me a pound coffee they said.
@Nigal Dabster:
I still wonder why I should be getting red?
Olives and peas does this fit / taste together? Which dish recipe do you mean?
-
Oh are we a little bit the prince on the pea this evening? (*)
(after Hans Christian Andersen, some Danish world literature might fit here too).
Please keep in memory, to bring the vegetables here to the "table" was not my idea.
-
OK, will get a rough file rasp, when I understood right I should better use a rod file then a flat one?
The 175cc Bultaco had alloy ones, this bike have steel ones front and back! These where the original ones that came with this bike, they are really loong, but my model has been made for Italy in 08/1981?
"tracing paper thats novel" sounds very british sadly I'am not so sure what it means.
Oh yes please, I'am very interested in any modification that helps, (I mounted a slightly heavier spring to the rear brake shoes, so the brake action might be a little bit more clearly (I hope)).
-
Thanks for the good advice.
Unfortunatly I don't have any engineers blue, only tracing paper and chalk.
In my destitution I therefore chose chalk, which worked somehow.
It looks like the lining of the one brake shoe is completly too thick, (beside one triangular edge,
which must be a production failure). The other side touches the hubs "only" in one quarter of
the "shoe area".
Milling down so much, without any special equipment, mmmh ... sounds like a job where you have to use a lot of "elbow grease" without knowing if it ever will turn out right. I will sleep about it, we'll see what the next day will bring.
BTW.:
- My hubs are not re-lined, they are still ok.
- I believe I have the right brake arms, they are very long and out of steel.
Yes, theese brakes are not so good, they are crap in water, the chrome plating inside the of the hubs have the tendency to chip of. The action is bad, the front brake arm looks out like a figurehead of a sailing ship. the rear brake "feeling" is bad because of the long cable. ...
It's a Bultaco ..., I have a 1979 TY too, switching the bikes is a complete different experience when it comes to braking.
-
I just replaced the brake shoes to my Bultaco, got replacement ones and installed them.
when I mount them without axle all seems OK, there is some space so they should run free.
BUT when mounting the axle they don't fit the pads slide very strong.
Some options:
- mill away a mm or so on each side of the supports to the cam, (they look thicker)
- mill away the sharp edges at the beginning and the end of the linings?
- get another pair of shoes that fit
- ...
Any better or other suggestions how to align the lining so they fit again. It's "difficult" to see where the problem is. By the way the axle is not bend!
|
|