Unfortunatly I don't have any engineers blue, only tracing paper and chalk.
In my destitution I therefore chose chalk, which worked somehow.
It looks like the lining of the one brake shoe is completly too thick, (beside one triangular edge,
which must be a production failure). The other side touches the hubs "only" in one quarter of
the "shoe area".
Milling down so much, without any special equipment, mmmh ... sounds like a job where you have to use a lot of "elbow grease" without knowing if it ever will turn out right. I will sleep about it, we'll see what the next day will bring.
BTW.:
- My hubs are not re-lined, they are still ok.
- I believe I have the right brake arms, they are very long and out of steel.
Yes, theese brakes are not so good, they are crap in water, the chrome plating inside the of the hubs have the tendency to chip of. The action is bad, the front brake arm looks out like a figurehead of a sailing ship. the rear brake "feeling" is bad because of the long cable. ...
It's a Bultaco ..., I have a 1979 TY too, switching the bikes is a complete different experience when it comes to braking.
I just replaced the brake shoes to my Bultaco, got replacement ones and installed them.
when I mount them without axle all seems OK, there is some space so they should run free.
BUT when mounting the axle they don't fit the pads slide very strong.
Some options:
- mill away a mm or so on each side of the supports to the cam, (they look thicker)
- mill away the sharp edges at the beginning and the end of the linings?
- get another pair of shoes that fit
- ...
Any better or other suggestions how to align the lining so they fit again. It's "difficult" to see where the problem is. By the way the axle is not bend!
The desired surface should be absolutely clean and free of grease. To clean the "pores" of the surface, I use pure polish for paint or plastic, without any wax components!
Then I wipe off the surface shortly with brake cleaner or acetone, just to get rid of any grease and fingerprints.
Best way to avoid finger prints is to use gloves!
Before you mout the Sticker, pull the sticker off the backing paper and spray "relaxed" water to the adhesive surface and also to surface that will be later covered.
To "relax" the water use a splash of detergent.
Then you can apply the sticker surface without any force, now you can move the sticker / decal back and forth until it is at the right point.
Then you eliminate the water away with a squeegee, this in systematic approach, (the procedure depends on the shape of the label and the surface and is sadly too complicated to explain, perhaps there exists a good How to ... video on Youtube).
Afterwards warm up the ground with an ordinary hair dryer and if there might show up small air bubbles in the push them away to the shortest way towards the edge, use the squeegee to do so. (If the decal is warmed up and the aadhesive still fresh this works very fine.
Then wait at least one day befor you ride or wash, ... your bike.
I disagree completely. Horsepower numbers will show that there is more power to be made using more oil. That isn't my opinion it is documented scientific fact, period. If 100:1 works for you or Helmut (I am aware of him although he is from ontario I am in BC) then thats fantastic. More oil equals more horsepower. Give A. Graham Bells 2 stroke tuning theory a read or any article written by Jennings (cant remember his first name Gordon I think). They are easily available on the net. Their research and development on 2 strokes is world renowned. However as mentioned if opti 100:1 works for you or anyone else thats great. I just prefer to use 50:1. Keep in mind my background. I have been a motorcycle mechanic working professionally in a dealership for 20 years. I have rebuilt literally thousands of 2 strokes and 2 facts I can gauruntee with great certainty, wiseco 2 stroke pistons always seize and if using ratios of 60:1 or less will equal engine failure for most people. Those of us on this forum are much more
without getting too far into the oil debate i am not of the belief that less oil is better...... necessarily. Any name brand modern 2 stroke oil mixed at the oil manufacturers spec is fine. I use torco gp-7 @ 50:1 in my trials bike. 50:1 does seem to be what most folks are using in the sherpas. In actual fact the harder a 2 stroke engine runs the more oil it needs. Lets take a bultaco astro as an example. here is a bike that is meant to run wide open and fast all the time. This engine needs more oil to help disapate heat away from the piston and into the cylinder wall. An engine that runs at lower rpm like a sherpa t doesn't generate the heat like an astro or a pursang so one can get away with using less oil. Optimol while still used widely here in canada and the u.s. is only good for trials type riding. In any motocross style bike that i have seen it used in they seize. this may likely have been caused by poor setup and maintenance but none the less if more oil had been used the repairs would have cost less. So in closing use any name brand 2 stroke oil like bel ray, yamalube, golden spectro, maxima, torco, motorex, motul etc etc pick one stick with it and mix it the way that the bottle tells you. Usually the manufacture will allow for any variance between 32 and 50 to 1.
Theres no secret just pick one and stick with it
Steve
Any discussion of pre-mix ratios opens the pandora box, anywhere and anytime.
I do not know why, let's take it as a statement.
here I can only state my personal opinion.
@ BultacoSteve
You are from Canada than you might know "vintage speedy", or in his full name Helmut Clasen,
(He is a member of the Canadian "Motorcycle Hall of Fame" lists so I assume you might know him ?).
He runs also Optimol at a ratio of 1:100 in his bikes, (That he is still racing, ....).
His statement in the German Offroad Forum from 2009 where they discussed if there is any oil as good
as the old MAICO racing two stroke oil that could be used in a ratio of 1:100:
When Bultaco was still in business, there was a special synthetic two stroke oil under the brand name Bultaco available, it was made specially for Bultaco. With this oil you could run the engine for trial purpose with 1:100.
The manufactor of this oil was OPTIMOL in Munic, they made 200ml bottles with a scale on the side for every 5l gasoline.
Sadly Optimol has been bought by some US guys already decades ago, they still manufacture the oil but don't sell it here, the manufactors name: Interlube International
The Opti oil has some special treatments compared to other two stroke oils: Technical ...
With a good sysnthetic two stroke oil from Castrol, Motul(France) or MOTOREX (Switzerland) and premium gas something between 1:60 up to 1:75 will also work,
(I use 1:75 now, sadly my last bottles of Bultaco two stroke oil had been used with my Beta TR34 in 1987).
Benefit of less oil, less carbon, less clogging up the exhaust system.
Hi, i have what I think is a 198, the frame number starts with 198 and then some numbers.
The bike has the alloy bashplate/no frame rails at the bottom. Am I right in thinking the bashplate model was 198A and 198B?
If so maybe mine has been converted - if it has then its a professional job and looks very much like others I have seen so Im not worried but it'd be nice to know.
I'd have expected the frame number on a 198A or 198B to start with 198A (or 198B) not just 198...
Any ideas?
thanks
The frame number should start with two letters then a hyphen then comes 3 digits with the model number. like your mentioned 198 after that the serial number of that number, a or b models are marked by a second hyphen then comes the letter.
Number as follows:
AA-MMMXXXX-S
A: letters
M: model number
X: serial number
S: A or B model, (if none of this forget the hyphen and the S)
Here as an example for the serial nuber of an 199b model:
(for turning in clockwise direction, or rechts herum in German or turning right in Englisch).
Than turn the screw out 1 and a half turn against clockwise direction, or links herum in German or turning to the left in Englisch)
This is the standard position for the pilot screw, (NOT the idle screw!,)the engine might run but not best, no you can finetune the by turning in quarter revolutions.
If you turn to the right, close the screw, or clockwise the mixture will be leaner.
If you turn to the left, open the screw, or counter clockwise, the mixture will be richer.
The plan is to get it sorted mechanically and leave the cosmetics for this year until I know its sorted and so I dont spoil it when I keep falling off. The BIG problem is the forks are shot - obviously not an easy or cheap fix :-(
Anyway here she is ...
...
congratulations,
a very nice bike, needs some work, but thats part of the game and is fun too.
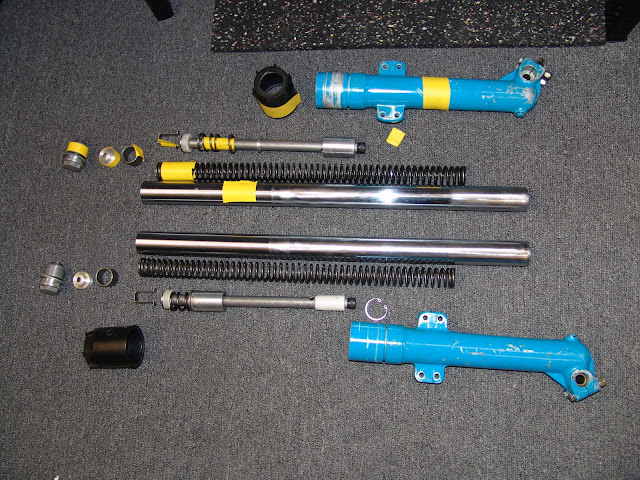
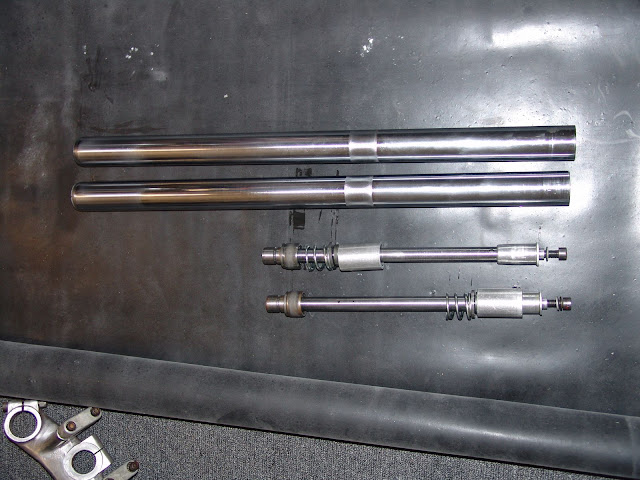
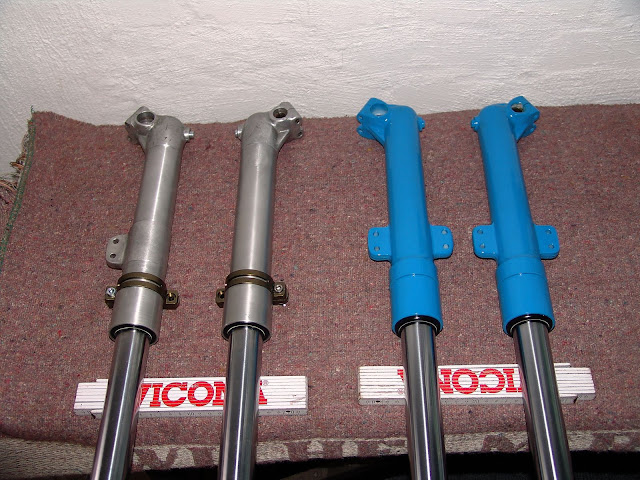
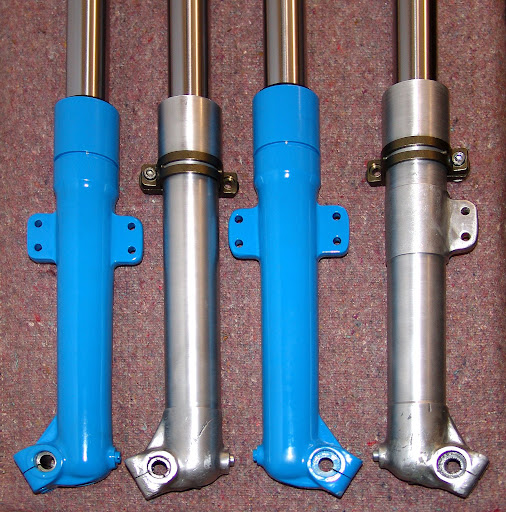
I had the same problem like you when I found my Bultaco the upper stanchions where bend and the chrome was scratched. My forks after disassembling:
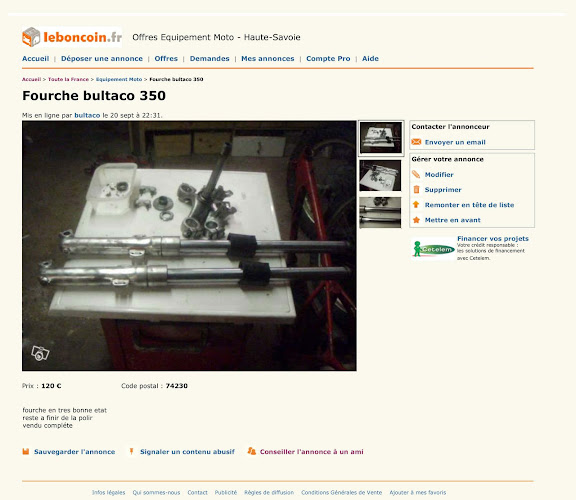
I looked for a second fork and found one in France which was complete and came together with the fork clamps, the price was OK.
Well ... the stanchions had some rust marks and where worn out, (the lower fork legs that work as guide for the stanchions too. Here the second fork from France:
After a deep breathe I decided to attack my wallet and gave both stanchions away to a company here in Germany that do real hardchrome work for machinery parts. To rework stanchions is not their daily business but there fabrication tolerances are extremly high and they can also straighten them.
I do not know how the rocker is mounted to the rockeraxle of your bike - I have no experience with Frontera or Pursang models, there where to different construction, (as I know):
- A: one with bronze/brass bearings, (like model 199a and 199b)
- B: one with rubber bearings, (like model 221)
A: When you have bronze/brass bearings there should be inner bushings made out of steel, these are wider and should fill the gaps, soem space you need for assambling as already mentioned by John Collins.
By the way the O-ring on the each of the outerside between the bronze/brass bearings is also a little bit "responsible" for the gap.
B: When you have rubber inlays as "bearings", (some older Bultaco bikes, at least some Sherpa's like mine model 221), then there should
be a small gap between 1-2mm on each side, for mounting the engine mount and the rocker. this gaps will be closed when thigtening the bolts of the rocker axle.
I would say if there is onle litttle play around 1 - 3 mm it is OK.
1- Because I think it will let the tire spread out and conform better to the terrain.
2- Because I have one.
As you already have the rim, just to note the punches and the direction of the holes of your rim have to fit the hub and the way the spokes are mounted? (Just my two cent opinion).
To the dimension, the tire is a 4.00'' wide, your other rim "only" 2.15'' the original 1.85'' so where is the problem.
Does someone sell rear sprockets on line? I'm told the wheel is from a 1971 Alpina. Chain size is 428. ID about 5.75, 6 bolts, 3 pins about 8mm, bolt/ pin circle about 6.375, shallow counter bore.
The wheel is on a BSA C15 and I'm looking for a big sprocket up near 80 tooth. I could even do the ID and bolt circle machining if sprocket blanks were available in that size.
You can look up here, they have sprockets front and rear, maybe they manufacture a special one on your request, but this will cost some money!
I'd like to replace the 1.85 rear rim on my 199A with a 2.15. There is very little clearance on either side. Does anyone have any experience with this?
No experience, I did change my rims, but took the standard width. I know it is not so easy to get Acront rims nowadays but it's still possible, even the original red and yellow label one's. If you need the ressource PM.
My question to you is why do you want to mount a wider rim?
hi all ive got a 199A 350. year 1980 i took the engin out for rebuild. when i put the engin back in the frame. i replaced it with the metel one witch was ok. my question is the one i took out was alloy was this an original? are was it a mod?
As I know the rear engine support is made out of steel, (it's steel on my model 221 and on my model 199b). There should be the Bultaco logo stamped on the outer side which faces to the tire, then it is original, (once again at least on the 221 and 199b model which I have).
hi all whats the best size spocket to have on me 199A? i curantly have the standard 39T rear and the 11T front. ive not done any trials since i was at school. that was along time a go ah. will the ones ive got on now be ok for a beginer?
Go for this gearing, just perfect IMHO and the standard for this bike and model.
much help needed. ive just finished my 199A and my front sprocket is leaking. so i changed the seal behind the front sprocket and the o ring and the metal bush. i replaced the sprocket and it was still leaking. it is leaking from the final end drive. so i replaced the seal on the end of the gear shaft. it is still leaking slightly but can you advise that this is normal for bultacos?
Mmmh,
If you have installed the bearings right there should not come out any oil, Now there is only guessing left:
1.
The axis of the front sprocket spindle contains the shaft of the gear box and the clutch pressure rod / pin, like these russian puppets. May be you have something installed the wrong way from the inside?
It is no problem to let them stuck out some mm, the dust cover will fit anyway, at least mine do. There do exist two original late cylindirc rubber dustcovers from Bultaco one with a small loge around 5-7mm in diameter and the other one with has a logo around 12 - 14mm in diameter, the one with the smaller logo fit. I would always mount two seals and as these rings have a double lip, you can place seal grease in the gap of the lips, (when purchasing a set of them, you get a little tube from Ariete with that special grease).
Yes, main bearings were changed - it was by Dave Renhams engine builder, so i would assume it was done correctly.
Your exhaust looks good. What brand do you use? (I use Halfords and i am not convinced)
Mine always look like that until they get a drop of oil/grease/petrol on them and then they are stained. Is that because they have not been cured do you think? The surface does stay rough.
This time I tried over coating mine with VHT lacquer, which looked great, but today spilled petrol on it and it came off in seconds - very annoying!
I think i will see if i can spray them again and the get them baked (they will not fit in my oven!) or fit to the bike VERY carefully and bake them in situ.
Thanks,
Max
Have used POR15 once with best results but this paint is very pricey and difficult to apply, the paint here is from a supplier for professional workshops "Werkstatt Bedarf" in Germany suppose to be resistant up to 600
It is still running the original Amal carb. The bike has only done a genuine 187 miles would you believe (it has been my fathers since new)
I am thinking it may well be the carb/slide body. Would it help to give the slide a light rub with 1400 (or higher) grit wet and dry to make sure it is as smooth as can be, do you think?
Or is there anything you can use to lubricate the motion slightly?
I am happy to buy a new slide, but wonder if it is worth trying anything first?
AND any suggestions or tips for VHT paint for exhaust?
Thanks all.
Max
The main bearings of the crank where changed too and are installed proper? You can try out your easy checking method at leat on the ignition side.
To the paint job, I have personal got good result with good heat resistand paint from the can when the silencer was blasted so no rust or old paint was left.
After application you should wait until the paint is really dry and then store the parts in an oven or "heat chamber" for some hours. Ask your lokal paint shop if they can do the paint job and heat threatment for you. You will notice that the paintsurface of a heat treated exhaust is still dull but has not the same rough surface anymore which is normally typical for this heat resistance paint when applied.
By the way don't apply the paint when it is too cold, best temp. is around 20


 ?
? much help needed. ive just finished my 199A and my front sprocket is leaking. so i changed the seal behind the front sprocket and the o ring and the metal bush. i replaced the sprocket and it was still leaking. it is leaking from the final end drive. so i replaced the seal on the end of the gear shaft. it is still leaking slightly but can you advise that this is normal for bultacos?

Bultaco Sherpa Brake shoes do not fit?
in Bultaco
Posted · Edited by PSchrauber
Thanks for the good advice.
Unfortunatly I don't have any engineers blue, only tracing paper and chalk.
In my destitution I therefore chose chalk, which worked somehow.
It looks like the lining of the one brake shoe is completly too thick, (beside one triangular edge,
which must be a production failure). The other side touches the hubs "only" in one quarter of
the "shoe area".
Milling down so much, without any special equipment, mmmh ... sounds like a job where you have to use a lot of "elbow grease" without knowing if it ever will turn out right. I will sleep about it, we'll see what the next day will bring.
BTW.:
- My hubs are not re-lined, they are still ok.
- I believe I have the right brake arms, they are very long and out of steel.
Yes, theese brakes are not so good, they are crap in water, the chrome plating inside the of the hubs have the tendency to chip of. The action is bad, the front brake arm looks out like a figurehead of a sailing ship. the rear brake "feeling" is bad because of the long cable. ...
It's a Bultaco ..., I have a 1979 TY too, switching the bikes is a complete different experience when it comes to braking.