| |
-
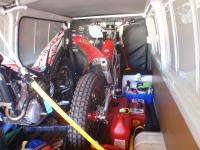
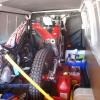
We are also in a tent and have hi-ace for carting trials bikes around. I borrow a mate's bike trailer sometimes as well. We just did 3 nights in this tent at 2-4 Deg C...geez it was cold in the tent. Pic of last set-up...
Mags
-
Here is the Jayco motorcycle transporter.... the new model has toilet and shower onboard and air-con for the Aussie summer, sleeps 4.
Mags
-
Hehehehehehe! I didn't realise turning up with that and having to be be a potential "Dabill"! I can see that now!!! Hehehehehe
We have a caravan manufacturer here that does off-road caravans for motorcycles and sleeping! I'll see if I can get a pic.
Mags
-
Simon,
Apologies! Sounds like you have it well in hand! Might be time to mill them off and helicoil???
Like you know, could be serious Galvanic Corrosion but you would think one would be less corroded and "give"!
I've never seen a left hand thread in a hub...MMMMMmmmm! If you eventually have to machine, try one left?
I had some trouble with Yamaha components and the military grade orange loctite they use. Geez it takes some undoing at times but you are past that!
Post final result.
Once again apologies if I came off patronising... didn't realise your level of experience.
Mags
-
Hey Simon,
I can add a few tips... I play with loctite!!!
It does denature with heat... the temp is about 150-160 deg C for most products they have for thread locking.
How you apply the heat can make a big difference. For example if the thing its connected to is a giant heat sink or transfers heat really well you may have to apply a little more heat than first thought.
A small butane torch can be invaluable for denaturing loctite in a controlled and concentrated fashion.
The pic below is me denaturing loctite on a disc rotor before attempting to remove the fastener. The thin beam torch concentrates the heat down through the fastener and into loctite on its way to heat sink surrounding it.
Another little tip is to set a torque wrench to fastener value but in the undo position. Heat fasteners with butane torch and take to temp.... think hot baking tray in an oven doing the roast... thats about the temp! Count seconds to heat it ...say 40 secs, then apply torque. If unsuccessful up torque by 5% and the heat time by 20%... and go again....
Eventually the method should undo the fastener with the LEAST risk of stripping the fastener.... its just applied in a methodical and controlled way to give you the best chance of success.
Good luck!
Mags
-
Saw this motorcycle sport trailer at a recent motorcycle show. Was pretty flash in the flesh and could even carry a camp stretcher or two to sleep in for an overnight trials comp???
The front compartment has battery for lighting and a big area for dirty gear... muddy boots et cetera, hose out when home???
Cost was just under 10,000 english pounds.... don't know if thats good or bad in England? It was $18,000 hearer and seemed reasonable value for the fit out.
You can even cook up a storm at lunchtime ...on the bar-b-cue!!! It also has water tanks.
I would like it to have a bit more clearance for off-road towing to get into the harder camp ground accesses?
Mags
-
Thanks Andrew! Might come in a bit cheaper from there, probably around $350 landed? Still pretty expensive for a stand?
I'm slowly gathering some worship equipment for home as I've fabricated stuff since a boy. So far have a Kempe Digital TIG welder, a plasma cutter, band saw et cetera. The icing will be my Auto feed Mill and then a good lathe!
Be a project to make my own stand??? In titanium tube maybe? Especially as my labour is free for my stuff.
I may be happy later on to not have a stand but for now its handy for parking the bike at camp or on a creek top to give my wife a "spot" as she tries a scary bit for her!
Mags
-
Damn Mate! I thought I was the only wally thinking my bike always tries to fall over.... I have even made a strap that goes from stand to holes in bash plate to keep stand as forward as possible. Stops the stand going up when you don't want it to as well!
It has been ok on dirt (just) if you are really careful where you park BUT the thing is positively dangerous on concrete!!! I also nearly lost it warming it up at home on shed floor!
So 12mm is good enough huh? Did you just cut and re-weld? Did you feel the need to use a small piece of tube to fit inner I.D of stand, leave 2mm gap and weld? Linnish smooth and repaint in metallic silver??? Cut between rubber button and bottom of stand you reckon????
The paint is chipping off mine in two places so I was going to get it chromed???? I might remake it in ally, eventually???
Mags
-
Johnny,
UK site has Mitani for 180 pound... conversion to Aussie dollars is about $350... $100 for freight and then some for import duty and GST (VAT) might be $550 even?
-
Johnny,
The Mitani sidestand is around $500 landed here in Australia I'll stick with my mod for a bit!!!! I will hint to the wife Xmas is NOT that far away!!
Mags
-
MMMmmmm! Somewhere on last ride my side stand rubber fell out on my new 4RT. I did an interim repair with plastic hose and zip clip. Didn't want the metal stand potentially rubbing on the thin carbon fibre swing arm protector.
Here is permanent fix...
I grabbed a 5mm Nutcert which was closest to the diameter of the hole drilled in the side stand for the rubber knob. I had to drill the hole to 7mm diameter for the Nutcert which was only about 0.5mm bigger than the stock hole size.
I then inserted and locked the Nutcert in the hole with pressing tool which gives a permanent 5mm thread where the hole was, see pics.
I found a plastic button thingy in my spares/never throw out box to use as the button for the 5mm allen head I put in the Nutcert. Actually I found two so have a spare! Can remember what it is but it looks like some from a tent pole or button to screw on for elastic expander ropes on an esky maybe???
It may wear the carbon eventually but nylon type plastic may not even mark it???? I'll keep an eye on it. Easy glue a bit of thin rubber on carbon guard.
Pics ...
Mags
-
I ran the pads in on my bike with water. I spray the disc and caliper with a spray bottle and do some rides up and down the driveway. Water took some time to evaporate and give good brake on each application of the water.
Did it ten times for front and back brakes. Back took much longer to dry water as rotor is not slotted. After done I spayed both brakes with brakekleen and compressed air. Made sure discs were getting hot (water gone, ride til coolish, go again).
Could be a function of the standard pad composition????
All brakes don't work that well when cold disc and wet.... but you said the AJP did! Mmmmmm.... still might come back to pad composition? Usually the pad wear slots shed water pretty well but if a dead cold disc from being immersed????
Pads from new need to reach a certain temperature to "set" them. Best done as a gradual rise in the temperature then cool and on to next temp rise. Some of the new car pads come with temp indicator dyes. You heat pads until first dye disappears and let cool, then up to next dye marker disappears et cetera.
I'm not saying do this for trials bike , just illustrate once pads are "set" they may deal with water better????
Mags
-
jj65,
The pic of the bike above.... great looking bike!!! I'd be happy just looking at it!!!
Mags
-
I have a log book as well. I have put motominder hour meters on the bikes now. First ride out with meter I guesstimated I had put 6-7 hrs on the bike.... Hahahahahaha way out! Hour meter showed 3.7 hrs!!! I was way over-servicing both bikes! Doesn't hurt the bikes but geez hits hard in the wallet!!!
And by the way... I wasn't bludging with my wife having 7 hrs on her bike for same period!!! I had my WR250R dual-sport there as well and was riding with the boys on the enduro trails as well as trials near the campsite.
So thats 3 bikes to clean from that trip.... no wonder I'm dreaming about chains turning to snakes and strangling me!!! Hehehehehehehehe
Mags
-
Oh ok! Logs!!! Hehehehehe I was very happy with little broomsticks!!! AAhahahahahahaha I'll grab a post or two...
I'm very wary of water into electrical terminals et cetera so am a bit paranoid about water ingress.... I wash with a small sponge and wash off with a fog nozzle (no hard spray).
I was thinking today to do wash every second day of riding...
I've read the whole thread and you have done it from first start of bike to where you are now... you can give me advice anytime mate! Admittedly we are more social trails riders than full on comp technical riders (for now)... BUT we have so much fun together, every time we ride them, it should be illegal!! Hehehehehe
Mags
-
Good pick up there Taff! Chain adjusted AND un-dusted! Hehehehe
Spoke polishing huh! I'm envious!!! (waxyWink) I've mucked around with a few show cars and have some trophies from motorcycle shows... a little of that has transferred to the trials bikes I suppose. Doesnt stop us getting them muddy or dirty though!!!
Mags
-
Johnny,
I use a WD40 type lube on the chains not a dedicated chain lube... found out the hard way its way to sticky for off-road. Its called INOX (theWD40 type stuff) and is a clear fluid. Its an Aussie only thing maybe?
Mags
-
Geez! If I start getting that adventurous I might need to get a second hand bike as test mule... and increase medical cover!!! Hehehehehee
I am trying to lift back wheel via front brake in a very straight line only... gets a bit scary! More practice there for sure! Once I get the front wheel up and hit target I'll break out the poles.
By poles you mean, say... two hardwood broom sticks good enough?
And speaking of straight lines.... how damned hard is it to ride in a straight line slow!!! I tried riding along a 6 inch round tree on the ground! Do you think I could go more than a few feet before popping off.... more practice there as well!!!
I was thinking of drawing two lines in chalk on the driveway 4 inches apart 10 yards long and try and stay in between them going reasonably slow?
Mags
-
I was hoping for some "trappings" this week... Hehehehehehe
Ok! Stripped it down and it looks pretty pristine in the bore and inside reservoir. Spring looks and feels great... including the small rod one.
All I can put it down to was the outer "O" ring a bit grippy because it seemed dry of a smear of brake fluid???
I've assembled back together and smeared just a touch of teflon grease on the outer "O" ring. This seemed to cure the issue as it returns beautifully now.
All bled up with good hard lever feel. Lifted front wheel up by milk crate and spun wheel and applied brakes 25 plus times... didn't stick once and wheel free wheels beautifully.
There was a slight area of corrosion on the "C" clip that holds the piston in. Brake fluid on the bare steel I'd say... the "C" clip groove was corrosion free.
There was a small burr inside and out side, from stamping it out, on the washer style plate that sits under the "C" clip. I used a 1000 grit stone and removed it.... for no there reason than it was out.
Time will tell if permanently cured, see how it goes next outing?
Some pics...
Mags
-
This is the wife's bike after a day trip to local ride area... would you leave this for another day ride and just hit it with more lube?
Mags
-
Yeah ok! I'm overdoing it I see! It is our only hobby (motorcycles) and I do enjoy fiddling with them.
Good to see if I miss a clean or two its not the end of the world!
I might just say its pretty dusty and mostly dry where we ride...
Mags
-
As a novice I voted stop allowed. I do stop for a second or two at times just to size up things. Obviously this would cease as I get better.
Speaking of stopping.... as a Novice I've often wondered why there is no flat piece of ground with tapes not much wider than bike making you turn pretty tight but not having to bounce a corner. Course is zig-zaggy with some 90 deg corners.
Also... mandatory box in centre where you have to stop and static for 5 seconds. Next 3 times through the static time increases by 5 seconds. If don't meet static time its a "1"... and move on.
Last bit of section would be straight with 2 logs, 8" diameter, across path, one bike length apart et cetera.
You could also make it mandatory slow... 1.5 minutes minimum time not max.. or its a "1".
If too hard at first... ease off static time and delete minimum time. Get medium experienced Novice to run it at set-up time?
This would be section 1 for Novice only... easy to set out and an achievable challenge (hopefully) for us newbys?
Mags
-
I hope I'm not the only one doing this... please tell me most of you do it???
Once home from a days ride on our bikes I spend the next 2,3,4 days cleaning and prepping the 2 bikes for next ride! That can be as soon as the next weekend!
First off I remove chains as they were getting tiny spots of corrosion from washing bike with them on, then removing. I have made a long tray that holds two chains flat and pour in kero and wash them easier now. Dry in sun when clean and leave in fav lube for a 1/2 day and hang to drip for a 1/2 day.
Next is washing the bikes.... remove tail sections, cover air filter inlet (cover ecu area on Cota), plug exhausts, remove radiator shrouds. Carbon fibre fork and swing arm covers off, wash and dry them for re-attach.
I have to gurney the tyres to get them pretty clean as we have bikes inside house at times to practice static. The rest of bike is hand washed and dried with a motorcycle drier... its like a hair dryer for motorcycles. Warm air comes from largish nozzle!
I also use water from my rainwater tank to wash them so no spotting of any surface with heavy mineral content water. This means after dryer no more needs to be done as far as removing water marks.
Every third ride day its change oil and filters on both bikes. Cota is a drama removing the casing but its a noble duty! Hehehehe. I have fitted hour meters now and that will cut down the over-servicing I was doing. I was changing oils every 3 rd ride day which could be a little as 6-7 hrs running. I'm happy with 12 hrs (recorded) and has doubled my ride days before changing stuff.
Then I go over bikes.... if no oil stuff I remove bash plates and clean them and under them. Clean chain guides.
Clean sprockets, lube where necessary, clean wheels, check spoke tension front and back, check tyre pressures, re-fit all pieces and Mr sheen the plastics. Look over stuff... check head stem for play et cetera, Re-fit chains, check tension.
She sparkles again !!! Ready for next ride....
I've never seen a dirty trials bike come off a trailer... only going on one! So many trials people must be the same??? Cleanliness and maintenance does alert you early to "issues" for fixing but I'm pretty proud pulling a sparkling bike out of van ready for first ride!
The other thing I've noticed... we seem to a very mechanical bunch in the main. No trial's workshop in my capital city! We all seem to do a heap of mech work ourselves?
Its great pastime and its a shame more kids don't learn some mech ability verses flicking buttons on the xbox controller.
Mags
-
Two stroke Cota in 2016...???? Go and grab a bar of soap and wash those words out of your mouth!!! (sudsyWink) Hehehehehe.
Luv ya thinking on the gold rims.... they would look great on the standard Cota now in my opinion. Just add stainless spokes and anodise the radiator supports gold to match wheels.
The triple trees in "tank red" would be ok also.... or anodised gold? One man's beauty can be another's fugly though...
Mags
-
Hey! Great idea! Never thought of that... MMMmmmm!
I have a decent driveway to do it, as well! Got an old motorcycle tyre here so will place on ground and practice putting front wheel in tyre from differing distances!
Thanks!
Mags
|
|