| |
-
I have bolted it on, seems to fit OK, but the KX400 case I have has a seized arm mechanism. Because of this I have been unable to check if it will work. It's on the back burner for a while, so if you get any good info I would be keen to know too.
Cheers,
Ben
-
Not really - you need to cut the pipe part of the silencer about 60mm short from memory, and made a hanging bracket from a piece of 25x6 ali bar.
-
I used the alloy shock bolts from Sammy Miller.
-
All I did was put 2 flat washers on the shock mounts before I installed the shocks, and clearance was fine.
-
Hi there,
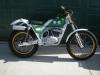
Rear shocks are Falcon - 360mm / 60lb springs
Silencer is Sammy Miller TY175
No other mods to the forks
Cheers,
Ben
-
No problem Glenn. It seems the stars aligned, and the mule trains were well fed to finally get you your hitch.
I can't believe it took less time to get from my place to your place (50000000000miles), then it took to get from the Suzuki Importers to my place (180miles)! Miracle of modern transportation really.
PS - could this be the start of a TC buyers network?
Cheers,
Ben
-
Hi Glenn,
I will be home Wednesday, and I have a Suzuki dealer a couple of k's down the road. Can you confirm this is your car?
SX4
I can get you a price Wednesday, and talk to my shipping company and see what we can work out.
Cheers,
Ben
-
Hi Jim,
Thanks to your site we figured it out. His Beamish is a 78/79 (has the rear frame loop), and it currently has the steel tank, so it is correct. He does like the look of the alloy tank, so we will keep a look out for tone of them too. I attached some photos too, but for what ever reason, the last person put 250cc decals on it too.
Cheers,
Ben
-
Hi Carl,
No action yet except for getting the tank clean. A move of house and a 4on/1off work roster is making it difficult.
I will keep you posted.
Cheers,
Ben
-
Hi Guys,
My Dad has his new toy - a nice 1981 RL325 Beamish. It currently runs an RL250 tank, and while it looks nice, its just not right. Is there anyone out there who has or makes the larger RL3235 Alloy tank.
cheers,
Ben
-
Hi guys,
Progess is being made on my 240 restoration, but I am having problems with my rear brake lever setup. The bike as I got it cam with a random brake lever on it, and it looks like they have butchered the mount to make it work.
I have my fabricator making new footpeg/brake mounts, and I have an original brake lever on the way. But what I need is details on the pedal mounting bolt arrangement - can someone tell me if the proper setup is a pin, or a bolt etc so I can get my fabricator to make the mount right.
Do I get him to drill a through hole, or tap an M6/M8/M10) etc to mount my pedal?
cheers,
Ben
-
Hi Guys,
Just stripped my new (to me) Fantic 240, and I have found 1 problem - the rear hub is fairly wrecked from what I expect is loose sprocket bolts. I need to get hold of another one, so can any one tell me other brands/models that run the same rear hub? I have been told SWM hubs are the same, but I can't confirm.
Any help would be great.
Cheers,
Ben
-
Hi guys,
I wish I had 1 too...
Hang on I have 3! (with a fourth in pieces waiting to be made)....
Cheers,
Ben
-
Hi Glenn,
I still have the original rim, so I can measure the old rim and the new rim, and work it out that way. I ended up going with some Morads supplied by Central Wheel - should be over here in Aus after Christmas I hope.
Totalshell - I will pick the bike up in a week or two and inspect the carb - I have located a supplier of parts so it just might need a rebuild. The previous owner's assessment of the carb was "it's stuffed!" Once I work out what is wrong, I might give you a buzz.
Cheers,
Ben
-
G'Day Woody,
You are an absolute star! Thanks a bunch for your help.
Cheers,
Ben
-
Hi Carl,
I did see that, sounds like a good a plan as any, except with the addition of the Blue Lightning. The common problem I read about is people who don't line the tank have problems with fumes leaking through and bubbling the paint. I have also read that you can use a hot air gun on the tank after you have sanded it.
From finishing.com:
There are two issues involved in painting polyethylene. One is to "activate" or "modify" the surface chemically to allow wet out and adhesion. In industry there are numerous methods used to treat the surface of polyethylene before bonding or painting. The best are too hazardous for a small shop or garage since the chemicals involved are actually dangerous. Reasonable bond strength - enough for paint - can be achieved with very light surface roughening using detergent water and fine wet-or-dry sand paper. This must be followed by careful flame treatment. An oxygen rich flame is best and the flame must not be allowed to melt or glaze the surface. Instead, the farthest tip of the flame only should contact the surface and then only for a brief fraction of a microsecond. The flame must be kept quickly moving at all times. Every square inch of the surface must be touched ever so briefly by the farthest tip of the flame in this way. After some cooling, the surface can be retreated if in doubt - but I would suggest running the flame in a cross direction to the initial hit.
The surface can be tested with super clean distilled water. Apply a single drop with a very clean eye dropper. On an untreated tank, the drop will bead up like on a well waxed car. No adhesion. If properly surface modified, the drop will actual cling to the surface and spread out to be at least twice as wide as it is high. This gives adequate adhesion for most applications.
I was thinking about trying this before I put the blue lightning in.
Cheers,
Ben
-
No problems Carl,
Glad I could be of assistance. The process I will do is:
1. Drain tank
2. Flush tank with acetone to remove as much residue as possible
3. Flush with detergent/truck wash and warm water, the rinse with fresh clean water
4. Leave tank without lid in the sun for 2 weeks to help evaporate hydrocarbons from tank internals and with the plastic.
5. Flush again with acetone and leave dry
6. Flush with detergent/truck wash and warm water, the rinse with fresh clean water
7. Use Blue Lightning sealer as per instructions
As for external painting, not quite sure yet. Since the inside of the tank will be sealed, painting should be a little easier - I have been told Sika 215 might be a good primer to adhere to the poly, but I am still investigating.
Cheers,
Ben
-
Hi Woody,
It would be great if you could get those measurements. Where would you recommend getting a delorto from?
Cheers,
Ben
-
I have just purchased a product called "Blue Lightning" to try seal my 240 tank before painting. LINK. It gets great reviews from many VMX websites as a good solution to fuel seepage in Poly tanks. I have yet to try it, so I can't give you a full rundown.
Hope that can be helpful to you.
Cheers,
Ben
-
Hi guys,
I have a recently bought a Fantic 240 which is coming as a few boxes of parts. I have a few questions which I hope all the Fantic nuts here can help my with.
Does anyone know the rim offset for the front and rear wheels? The bike is coming with rims/hubs disassembled.
Can anyone recommend a period carb, and settings? I cannot run an OKO as it will be ineligible for our national Twinshock class. Has anyone tried a Mikuni VM26? If so, do you have setup specs?
If I can get hold of a 200 top clamp, does it bolt straight on? Any mods required?
Thanks in advance guys,
Cheers,
Ben
-
Thanks Woody, I forgot to mention I am running those springs as well. As also used TY fork caps to remove the std "puffers".
Fred really is a good source isn't he? This bike runs his fork springs, fibreglass sidecovers, sidecover decals, fuel cap, full engine gasket and seal kit, airfilter, exhaust rubber and a few misc springs.
Also, I have installed an OKO 26mm flatslide which I have nearly got sorted. Trying a new needle soon which should get it real close. Such a great addition to the bike.
Cheers,
Ben
-
My 2 cents on setting up a KT to ride well:
1. Get 360mm long shocks on it
2. Extend footpeg mounts down 20mm
3. Install bar adapters that move the bars an inch forwards Roxspeed Bar Risers
This is my bike, and now has these mods and it rides like a dream.
Cheers,
Ben
-
I have just been lucky enough to get a very tidy KT250-A2 in my possession. It is missing a seat and its sidecovers though. Thanks to David (Feetupfun) I will shortly have seat on its way, but I am still missing sidecovers. I tried Fred and Deb's KT page, but he is out of sidecovers for a few months. Does anyone else have any leads on where to get a set of sidecovers for my bike. I am not fussed if they are the wrong colour or not painted at all, as I have someone local who can paint them for me.
Cheers,
Ben
-
I have got the 28mm Keihin on my Scorpa and it runs like an absolute dream - it is the crispest sounding Scorpa I have ever heard in Queensland. Be aware though they are a bugger to fit and you will need to get a new throttle cable made.
Mine came on the bike when I bought it, but I was informed by the seller that he purchased the carb as set up for a Sherco from Don at Trialzone. Best bet would be to talk to him. This would be the cheapest way, but the other problem you will find is the choke is on the wrong side and is a bit fiddly to get to.
All in all I say a very very good mod for the Scorpa, despite the fiddly-ness of it.
-
Howdy,
I believe the clutch plates, springs and pressure plate are the same parts as a YZ125N (91/92) I think. When I smashed the clutch basket on my SY250 i picked up a pressure plate from the wreckers for a YZ125N and it was a direct fit.
Cheers,
Ben
|
|