| |
-
Take a look at the "Woodruff Key" thread in the Beta section. It addresses your situation.
Ed
Keep the rubber side down!
-
It could be as simple as dirty points. . . . and yes a bad condenser would result in no spark.
The usual procedure for restoring a bike from the dead which has no spark is to replace 1) spark plug, 2) check the condition of the spark plug cap (replace if ugly) 3) points and condenser (setting timing is part of this process), 4) high tension coil. After all that, if you still don't have spark go back to points and condenser and check the solder joint on the condenser (that's a common place for garage mechanics -like myself- to mess up).
Have fun!
Ed
Keep the rubber side down!
-
The true function of the woodruff key is to provide for proper alignment of the flywheel on the crankshaft taper when you slip it on. The woodruff key's function is NOT to prevent rotation of the flywheel on the crank after it is fully assembled.
The flywheel must seat fully on the taper and the nut must be properly torqued - then the mechanical "lock" of the taper resists all the normal rotational loads.
My GUESS is that this time, as you installed the flywheel, the woodruff key got bumped a bit and slid in it's groove such that the back end was "higher" than it should be - and it prevented the flywheel from seating "squarely" and completely on the taper. OR perhaps you forgot to properly torque the nut?
Anyway, I would recommend a check for damage to the taper on the crank or to the internal taper in the flywheel. If all appears to be OK - you should be able to re-install with no problems. I have spoken with folks who heat the flywheel to about 200 degrees (F) before installing the flywheel on the crank (to help insure full taper contact) - but that seems like over-kill to me, and I have never found it to be necessary. It also seems like that would lead to the need for considerably more puller force when the flywheel gets removed the next time, and I don't like that situation.
Final note: always spin the engine and watch the flywheel for wobble before installing the cover. If my guess (above) was right, you would have seen some wobble.
Ed
-
Dan:
Oh, Oh, Oh - now you are getting me excited about data!
In most cases the rider weighs more than the machine, therefore the location of the rider on the machine is rather important to the overall handling characteristics. In addition, there are ergonomic factors which affect the rider's comfort and ability to move about on the bike.
I have a "generic" diagram which "asks" for certain dimensions which allow direct comparison of one bike to another regarding some very important machine and ergonomic factors. Let me know if you'd like a copy.
Ed
-
Thanks for that last response Dan. I have a little personal study going comparing vintage trialers with the modern ones. Over time I'll probably manage to come up with some modern bike weights (front and rear) using a digital bathroom scale to compare with some of the vintage weights I already have (actually, precious few of those have been obtained so far). I thought for a second I might get a bunch of data really easily, oh well . . .
Bullfrog
Keep the rubber side down!
-
Did you happen to note the front/rear weights? I'm really curious about those.
Bullfrog
. . . keep the rubber side down!
-
My camera has feature which allows me to zoom in when checking photos in the on-camera display - so I can really see whether things are focused or not. Your camera may have that too - might check the camera manual.
-
regarding the action shot advice - which was excellant - I'd like to add the following:
Even after doing the "half press" on the shutter button, the electronic cameras do NOT take the picture at the "instant" you press the button the rest of the way. So you need to "guess-timate" the lead time between when the button is pressed and when the photo is actually taken. Practice this in the back yard, review the photos then dump them - no film cost and you've learned something! That's one of the cool things about the digitals.
I'd also recommend that you pan the camera with the bike and rider (keep moving the camera to follow the action) until you KNOW the photo has been taken. This helps assure that the photo doesn't end up with just the back half of the bike in the frame when the photo actually "clicks".
. . . and the panning MAY help reduce blurring of bike and rider in action shots and low light situations (at the cost of blurred terrain).
Finally, I'm pretty sure the blurriness in the photo you posted is due to being out of focus - not due to camera shake.
I'm an old 35mm photographer myself and had to learn a the above items with my Nikon Coolpix 4300 plus the items below:
. . . when walking around an event with the camera turned on, I must do a "half press" approx. 10 seconds before taking a picture to "wake up" the camera
. . . then I can aim and "half press" again to pre-focus on the photo area
. . . then I "pan" with the rider to near the photo area and press the rest of the way on shutter button
. . . and continue to pan with the bike/rider
All of that is kind of a pain - but - you can go out with the guys for some practice riding and practice your photography, and you can look at the results as soon as you get home (or maybe even on the camera, on site) and learn what works and what doesn't.
Good luck!
-
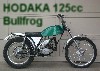
Here is a vintage bike for review.
-
Somewhere around here I have information on re-hardening T-6 aluminum after annealing and forming. I can't remember the temps - but it was a two step process. I'll see if I can find the data.
Step 1 - bake the part in the oven for several hours. Let cool slowly (leave in the oven till cold.)
Step 2 - same as step one except with a different temp and different time.
in both cases, temps were not all that high and the times were measured in hours.
Seemed to work well. My Bullfrog skidplate was rubber before treatment and is pretty dang hard (and stiff) now. (Sheesh, I hope that line doesn't encourage anyone to say anything untoward!)
-
Alan:
Sorry I'm so slow to respond - had a family emergency requiring a few days away from home.
I've been comparing GOOD (my judgement) 1970's trialers to modern trials bikes and have found some interesting tid-bits - which have almost become LAWS of TRIALS MOTORCYCLE DESIGN for me. At least until I learn some more. Note that these "LAWS" are applicable for "full size" bikes (125cc and higher) with "full size" riders - they may not apply to smaller machines and smaller riders. Yet they may provide guidance for the smaller machines and riders.
1. Target wheelbase is 52".
2. There is precious little reason for the footpegs to be higher than the line between the axles with the suspension fully extended.
3. Foot pegs should be 16" ahead of the rear axle. Although information is gathering to suggest this "LAW" should state that the foot pegs should be 36" behind the front axle (52-16=36). When stated in the second form, the "LAW" seems to provide for the proper placement of the pegs if the wheelbase is shorter than 52".
4. The vertical distance from the footpeg to the height of the handle bar ends should be 30"-31".
5. The horizontal distance from the foot pegs to the handlebar ends (think of measuring this out on a side view photo of the machine) should be 20"-21".
NOTE 1: The first three "LAWS" (given some small tolerance, say less than an inch) seem to be exhibited on good trials machines manufactured 3 decades apart. This suggests to me, those are the RIGHT numbers for those specifications.
Additionally, I am currently convinced that since 1) all trials bikes should have a 52" wheelbase and 2) the foot peg height on all such trials bikes should be close to the line between the axles and 3) the foot pegs should be 36" behind the front axle - decades of design and testing has shown exactly "where" the mass of the rider should be on a trials machine. This location provides for proper front/rear weight shifting for optimum control. So, since we know where the riders feet should be, we now need to identify where his hands should go. Again, 3 decades of designs give fairly precise guidance.
NOTE 2: "LAWS" 4 and 5 relate to the riding position the rider is "forced" to adopt. Tolerances must necessarily be larger on these dimensions to accomodate:
- rider size - arm length - leg length, etc
These measurements will NOT put the rider in the same position as the old TY's with the high pegs, low bars and nearly level rider's back with the uncomfortable kinked neck.
These dimensions do put a full size rider on a full size machine in a comfortable, bent leg position with the hands falling comfortably in position on the bar ends. AND these dimensions do not require the rider to "feel" like he is uncomfortably/unsafely well ahead of his hands when weighting the front end - yet still allow major weight shifts to the rear when that is needed.
That's my two cents worth of machine research - which does not address your questions relating to rake and trail - but may be helpful in thinking about mods on the smaller bike for the smaller rider.
Bullfrog
-
. . . and don't forget that the footpeg location along the wheelbase has a LARGE effect on weight distribution while riding. Shorten the swingarm and the footpegs are closer to the rear axle.
Changing the footpeg/handlebar relationship can have very large effects on rider comfort, steering, lofting the front end, etc. Changes in this relationship MAY be easier to accomplish than some of the things you have in mind and MAY provide many of the same effects.
-
The photo was taken at the Hodaka Days celebration this past weekend. It was celebrating the 40th anniversary of the introduction of the Hodaka Ace 90.
Jay is an expert class rider and designed the sections for our small "fun trial". We had only 5 sections and two laps - but everyone from the newest novice to the experts had something they could ride clean AND something that was a challenge. He lives some 200 miles away, and when he visits and regular folks see what can be ridden by a good rider even on a "vintage" trialer - they are amazed.
Jay's been riding modified Hodaka Trials machines since he was about 10 or 12 so it was great to have him ride at Hodaka Days. He's shown on his second custom built Hodaka which improves on his first one. It is lighter, with improved steering geometry and improved power.
Bullfrog
Keep the rubber side down!
-
That was real treat to watch! The terrain must be considerably steeper than it appears on the video, especially near the upper end with the rolling soccer ball size rocks. Thank you so much for making the video available!
-
Actually, I did work up some "art" for the tank badges on my bike.
I've not had good luck in the past @ attaching a photo - but I'll give it a go.
. . . I don't know what I'm missing -- but I can't seem to attach a photo.
-
I beg to differ . . . he DID say "hammered owl poop"! I heard it myself!
-
Gents, I'm sorry its taken me so long to reply. I had some catching up to do after spending so much time keeping up on the progress of the SSDT (and Team WOFTAM).
30 days after hiring on with Hodaka Motorcycles in 1971, I took out a bank loan to purchase a Saracen 125 Trials. Those machines were quite impressive what with the light weight and precise steering. They needed better suspension, brakes and more tractable power - yet they were impressive. So much so that an idea was hatched to build a Hodaka powered version. You can see the ORIGINAL Bullfrog on the strictlyhodaka website in the scrapbook, just a few bikes down from the top. The original was actually built on a modified Saracen frame and had an R&D Dept. 150+cc engine with special trials transmission (close ratio 1, 2, 3 and a bit of a jump to 4 & 5). Several of us @ PABATCO were trials enthusiasts and watched the project closely . . . and ended up with a severe case of the "I've got to have one of those" willies.
5 (or was it 6?) custom frames were designed and jig built based on the Saracen geometry. Curt Alexander of the R&D Dept. built the frames. The deal was that Curt would do the building if the other's of us would purchase the materials and Curt would get a frame at the end. That was a true "win-win" situation!
Curt finished the build out on his frame using a Cotton tank (like Leon Wilbanks' original) but with maroon paint. I believe he mounted a 125 engine - certainly with extra fly wheel weight. I know about the fly wheel weight because he made an extra weight for me. I finished my 'frog but, being about 24 or 25 at the time, the funds available for the machine AFTER beer, chasing girls and food, were quite limited. So my machine ended up with "economy" plastic fenders and tank (ie, free, scrounged from the nooks and crannies of Pabatco).
The machine was parked (and garage buried) from about 1980 to 2003. In 2003 I dug it out (literally) and got it running again. What a hoot!
General Specifications:
51.75" Wheelbase; 153 pounds (no fuel - 64 front, 89 rear); Model 94 Wombat lower end with Model 95 Combat Wombat top end with added reed valve; 24mm Mikuni; standard point ignition; extra 3.4 pounds of flywheel weight added to magneto side; 12 tooth or 13 tooth primary sprocket and 64 tooth final sprocket (generally prefer 12 tooth); lightly modified Wombat forks, 6.125" travel; Girling rear end, 4" travel; stock Hodaka hubs - older models, smaller dia. and weight - extended brake levers at hubs; 1.75" header pipe (1.5" replacement in progress now); Sammy Miller Muffler; Renthal bars; hand made seat, chain guard and air box.
Since my beer "needs" have decreased somewhat in the last 30 years and since my girl chasing has been limited to one particularly wonderful woman since 1977 and that leaves only food as a "drag" on my ability to obtain neat goodies for the Bullfrog now - I've started collecting some items to build it up the way it really deserves. I've got a Cotton tank to clean up, repair and paint! Bob Ginder helped me pick the right alloy fenders for installation front and rear. . . . and plots are afoot to re-do the exhaust system, chain tensioner and airbox.
Thanks for asking about the scoot Sendero! It's pretty obvious I'm (re) excited about it, isn't it?
Bullfrog
-
If I read the results correctly, there were two riders in pre '65 Scottish Two Day event by the name of Malcolm Smith. Were either of them the well known American rider?
-
Maybe our definitions are different, but "whiskering" the plug indicates (pick one, or more): too lean, plug too hot, compression too high. So, to me, going to a hotter plug when you are already encountering "whiskering" would only make it worse.
-
My computer spell checker automatically corrects "trials" into "trails" all the time. It's pretty easy to miss the "correction".
While fellow cyclists should have caught it, I think I'd give 'em some slack.
-
Ooops. I skipped right over the part about the tire coming off the rim. I'm stumped. I've NEVER had a tire come off the rim while riding. Surely there is some sort of mis-match between the tire and rim (rim to small?? - though I have NO idea how that could be).
-
Vinnied:
I thought I'd hazard a guess or two which may (or may not) be helpful to you.
1) I'm not sure the location of the tube failure is important in this case. If the valve stem had been torn out - we'd have a good idea what happened. But a tube failure on the OD of the tube near the valve stem? I don't think that tells us anything.
2) Your post said the tube "burst" at that point. Did it burst - or was it "mashed through" - ie stone cut against the rim? Were you riding rocks or other "square edge" obstacles when the tube failed? Does the tire show any signs of abuse = rock/rim cuts?
Ed
Keep the rubber side down!
-
It's beyond me how anyone can come to the conclusion that fuel prices are high in the US - look at the rest of the world.
-
In recent discussions regarding long intake tracts to "improve" bottom end, the tuning experts I talked with said it's not a good idea on two-strokes. It will reduce the precision of throttle response (soften bottom end). ie - longer intake path between carb and crankcase=more time for changed mixture to get to plug=delayed response. All the while, it will also probably slightly reduce the power available @ any rpm or throttle setting - so, at least according to my "go to guys" don't increase intake tract length or volume.
Bullfrog - Keep the rubber side down!
-
Another Hodaka trials special rider weighing in here. Mine has 3.5 lbs of flywheel weight added to the stock magneto flywheel - and it feels pretty good. Please do post your final solution, I'd be very interested in reading about the weight you add and how it works for you.
Ed
|
|