Ha, you couldn't make this up. Went to the sons ty this morning, blue spark, put plug in and it starts first kick. Running great for about 1-2 minutes then nothing like you've hit the kill switch. Pull plug and no spark. So put a tester on the end of the source coil lead, put in gear and spin over and nothing, so like b40rt says must be the condenser.
Best bit is though, a friend comes over with his new montesa, so we go out for a play, him on his montesa and me on my gas gas. We've been out an hr or so and we swap bikes. Ten minutes later I notice him trying to start mine. I ride over and he says it just stopped, I try and it fires and runs for a few seconds but won't Rev, so back to mine, pull the plug and surprise surprise no spark!! Well a poor orange one. I had a new spare plug, put that one in, way hay blue spark! Up she fires, and off we go again. What is it with me and electrics lol, I think I need to stick to pedal power.
still not sorted, really frustrated. Sparks when it feels like it. Even the plug I thought was duff is now sparking like lightning show, no idea now. Still won't start. Going to have to leave it before I lose it!
did you paint anything whilst it was apart?. you had a kill button and a weak spark, removed the button, no spark. buttons work by going to ground. have you painted over earthing points? try eathing coil to engine.
ps, sorry for leading you up the woodruff key path!
Hi Stan, not a problem about the woodruff, worth a check. I needed to take the flywheel off anyway to check the wires I soldered onto the condenser. My lesson to myself is to not assume a brand new plug is working as it should. I did state in my original post it had a good blue spark, that must have been while it was out, and under compression it was failing, until now it's totally failed.
A step in the right direction! Cutting a long afternoon short, I found the ngk 6 plug wasn't sparking at all, but when I took the plug cap off and put the ht lead to the head it was sparking fine. So cap back on and tried a plug, not the right plug but a good plug, and hey presto nice blue spark. Tried the basically brand new 6 plug and nothing, when it was sparking a weak purple before it must've been on it's way out. Luckily I kept the original no:7 plug that was in her before and tried that, ancient plug...but it was sparking blue. Reassembled the bike and she fired first kick. However she would not take revs at all. She ran for a minute or two and while I was feathering the throttle to get her revs up she stalled. Wouldn't restart at all. Took the plug out and it was as black as could be with soot. I cleaned the plug, checked it had a good spark and I put it back in, tried it but no joy, took it out and it was soaking wet so probably a bit flooded, I have been messing with settings trying to get her running so the carb etc is probably way out. At least it's been running. So I'm going to assume the coil, etc etc is fine.
First time I've come across a plug completely failing, especially a new one, I'll be replacing it with a no:7.
I'll need to be asking questions about the carb setting etc. Would you think the settings will be the same for the 50 as it is for the 80.
Many thanks to you all for your help so far, it's been very much appreciated.
I checked and cleaned the points, cleaned them with emery even though there new, I'm not sure how to check with the strobe, I'm relatively good with the spanners but these points appear to be a learning curve. I appreciate the help everyone is giving but bear with me. I refitted the flywheel and rechecked the point gap. I butchered a spark plug and bored it out to take a aluminium rod which was a loose slide fit. I rotated the flywheel till tdc then put a very fine mark on the rod, using my digital caliper I added 1.8 to that which should give me in the park setting. Set the points to .35. Put in the spark plug and it was a weak purple spark. Took off the kill switch wire bypassed and reconnected the coil straight from the stator and it got no spark at all, so I put a light tester as in the screw driver with the crocodile clip attached, direct from the yellow wire coming from the stator (primary coil?) and spun the engine with a battery drill and it lit up as in power coming from stator. Reconnect to main coil and no spark? So I'm wondering if the main coil is faulty ( it's also new).
The kill switch is new, but again who's to say it isn't faulty. She is sparking tho when the plug is out, and sitting on the head. I'm going to bypass the kill switch for now just in case.
Hi guys, thanks to you all for suggestions. Tonight I pulled the flywheel, but the woodruff key is intact and sitting where it should be. Visually I can't see any issues with the points or condenser as there new anyway but that's not to say for some reason they have failed. Just out of interest I measured the depth of the flywheel nut and it is 10mm so I wouldn't class that as extra long and I'll re torque it back to 29lb. Like Steve says I'll need to double check the timing. It's a bit tricky as I'm doing it by dropping the stem of a set of digital calipers and measuring the depth from plug hole then adding on the 1.8mm and then rotating the piston back to that point. I don't have one of those gauges that screw into the plug hole so I'm hoping my method is relatively accurate. I will be pulling the carb and reed block off and triple checking the carb for debris and making sure the reeds are not stuck. While the reed block is off I can have a squint at the piston, but she was running fine until she decided to get fussy. I'll recheck the wiring to going to the coil as mentioned but I renewed it when I replaced everything. I'll be working on her tomorrow and I'll keep you all updated with my findings, "if I do find anything"
On the ty trials shop page it has tips as well as supplying the part, for the woodruff key it says the flywheel must be torqued to 25-29lbs/ft but for the (special) nut for the flywheel they state it must be torqued to 50lbs/ft otherwise the key will shear, we'll both times I have torqued the flywheel to 29lbs/ft as I didn't want to over stress the threads as they claim to have two different torque values. I'm wondering if it has sheared the key. And if it has what state the end of the crank will be now.
On the the weebly spec page for the ty 80 it states the flywheel should be 3.5 -4.0 kg-m which is 25-29 lbs/ft so I'm unsure why the trials shop has 50 lbs/ft unless it's for that particular (special) nut? I'm not sure if that nut is a standard nut or like it says a special nut, it claims it's long to stop it stripping the threads but I can't remember the nut on the end of my crank looking extra long.
Ah, now there's a possibility. I replaced the woodruff key when I rebuilt but I did have the flywheel off again to recheck something and I reused the new one, I'm thinking that should have been ok, and I torqued the flywheel to the correct torque, although on a website for the ty there are two different torque settings if I remember correctly. But I think I'll need to double check the woodruff. Thanks for the suggestion:)
I had considered this project pretty much finished. She has had everything replaced from new carb to full engine rebuild. All cables etc, seals. There is basically hardly any original left. She was starting great and she had new points, condenser and coil. Points were set to 1.8mm btdc at 0.35mm. I have had a few runs on her and she was lugging me around, all 15 stone of me. She does have a new 60cc barrel kit as the 50cc was badly worn and scored. Just recently a friend came over and asked "does it run"? I promptly went to start it and that's when the trouble began. It ran for about 30 seconds then fluttered out. Since then it won't start. Although she is getting a nice blue spark and after a few kicks the plug is soaked as though she has flooded. I suspected a intermittent spark from the ht lead so I replaced that this afternoon, but still it's a no go! Still sparking, still seems to be getting fuel. But even when you try and bump start it, it turns over with no joy then gives a little burp of life as though it would like to start but then nothing. I've invested a lot of time and money and effort into getting this up and running for my son but I really am left wondering what could be up with it. I'm going to strip the carb again, and re-check but if anyone has any suggestions it would be greatly appreciated. I'm assuming the TY50/60 now, shares the same point gaps etc as the 80cc
I thought I read that ball hones are not ideal for nikasil because the coating is porous and the grit can remain in there. At this stage though I can't see how I could really make it much worse.
I'm thinking of getting a D piston in there which is 72.78mm at it's largest diameter, I'm not having the best time measuring the cylinder but I figure there has to be enough clearance.If not (once I measure it with feeler gauges) I'll then have to to the re-plate.
Hopefully having a larger new piston will stop the slap till I can afford the full re-plate.
Cheers
Ah, from what I have looked up since this post is ball hones aren't ideal for this job, I myself have not used a ball hone but was advised it would be ok as it wouldn't damage the plating, my apologies for the incorrect information. Appears to be either a rub with a scotch bride pad to clean or a re-plate are the best options depending how bad the cylinder is. Good luck with getting her up and running again
You could try a ball hone on the barrel, won't damage the plating like a stone hone would, it only removes a tiny amount of the cross hatching giving the piston rings more surface area to grip if you like. Might be worth a shot to see how good or bad the cylinder looks after!
Fixed!! After a lot of head scratching and pondering, turned out I had put the concave washer in back to front on the clutch, effectively clamping the basket. All is well now.
Not sure if West coast windings are still on the go, but if they are I wouldn't personally use them again from my experience for a stator rewind if you go down that route. They made a complete mess of mine years ago after I had my stator rewound, they claimed to have fixed it, sent it to me, I fit it to the bike no spark? I send back they claimed it was the trigger coil gone so they chopped off mine and rewired a new one on at my expense, I refitted still no spark, I had a friend with the same bike so we pulled his apart and fitted his bits to mine so I knew it was definitely something they had done wrong. Turned out they had rewound it backwards and had reversed the polarity so I had to swap the light blue and dark blue wires, I only found this out from contacting Steve at Motoplat. I couldn't praise him enough!!
As said in previous post, Steve at Motoplat is the man to talk to.
Finnaly got around to getting the bike back together after replacing the mains with SKF 6204/C3 bearings, and did the gearbox bearings with what was in the online ty80 specs and the numbers did match what I removed from the casings, I has to order a 2z bearing for behind the clutch but just had to remove one shield. Thing is though, I've had the bike started and had a small run around the garden, but the clutch is now shuddering badley and won't release, also it's difficult to get in and out of gear. I've tried all adjustments to try and get the clutch to work so I'm thinking I'll have to pull the cover again and make sure nothing's amiss. The other snag is....I've checked the flywheel just out of curiosity and I have the exact same up and down movement with the brand new bearings? It's fractional but I was expecting zero movement. Any suggestions as to why the clutch may be refusing to cooperate, its new levers and brackets on the bars, new clutch cable, worm drive was cleaned and oiled and appears to work fine, new clutch push rod with ball bearing, and the plates were still in spec for thickness as were the springs. ???
Ok thanks for clearing that up oni nou, rebuild it is then going to replace the gearbox bearings while I'm at it, at the cost of the bearings it would make sense to do. The one thing that concerns me though is the fact that if the mains need done, chances are the big end will need doing as well. Splitting the crank is one job I've never done before and is quite intimidating. But you never know, it may be fine! As may be the gearbox bearings, but I'll do them as they shouldn't a problem to replace while it's apart.
Hi guys, just a thought of mine. I noticed a little gearbox oil weeping from the clutch push rod seal, but before I noticed it was coming from there my first thought was perhaps the new crank seal I fitted was actually leaking, while rotating the flywheel to look inside I felt a little movement on the mains. Since then and up till now I've been planning my rebuild, after finding the bearings specs I was trolling through bearing suppliers, which led me onto finding out what a C3 bearing is! Turns out they have greater clearance for thermal expansion and until the engine is up to temp they can feel "loose" now my luck won't let me off that easily and she will most likely get the new bearings, mains/gearbox/ big end etc that she deserves. But! I wonder if I were to run her up to temp, switch off, pop the cover off and then feel what movement is in the flywheel, if any?
Thanks ? Yes a chain guard will be on the to do list, I'll look into that. I'm wondering if I can get something that will cover the chain and also wrap further around the sprocket. I may need to fabricate something, the original chain guards look quite minimal for protection. Don't think the wife will be to happy if I come home with 99% of the boy lol
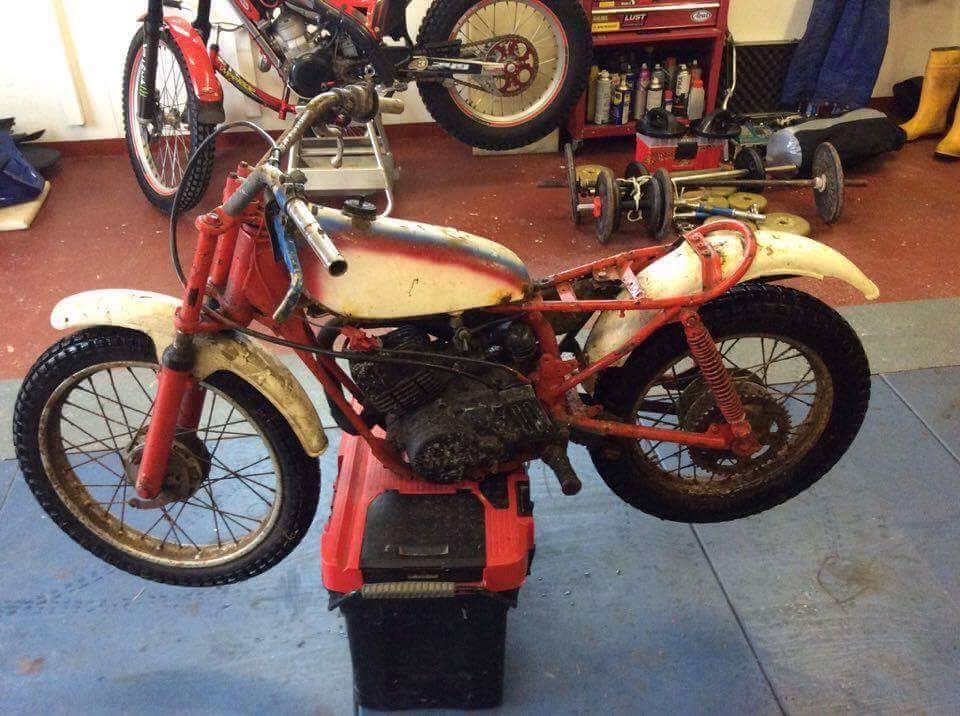
There was plenty of parts missing and other bits rotten with rust, I think what saved the frame was over her lifetime she has had multiple colour changes and has held the rust at bay from the frame and swingarm. Unfortunately the rims and spokes were bad, I managed to salvage the rims but had to replace both front and back spokes. The front forks were pitted beyond repair so I managed to source a second hand pair that were fairly corrosion free on the stanchions, so stripped and rebuilt with new seals etc and repainted. Exhaust was pretty ropey too but I've welded it up best I can with what metal was left to weld to, it will have to hold until perhaps next year I'll build a complete new system basically copying the original. Anyway I'll not waffle on about what's been rebuilt, replaced etc but I will say, what a fantastic starting little machine, way better than my gas gas. Only snag ATM is the rear shock seems to close to the chain? But all spacers etc are in place. The split link actually touches the spring as it goes past? Any ideas as to why that may be? Unless something is twisted around the frame/swingarm
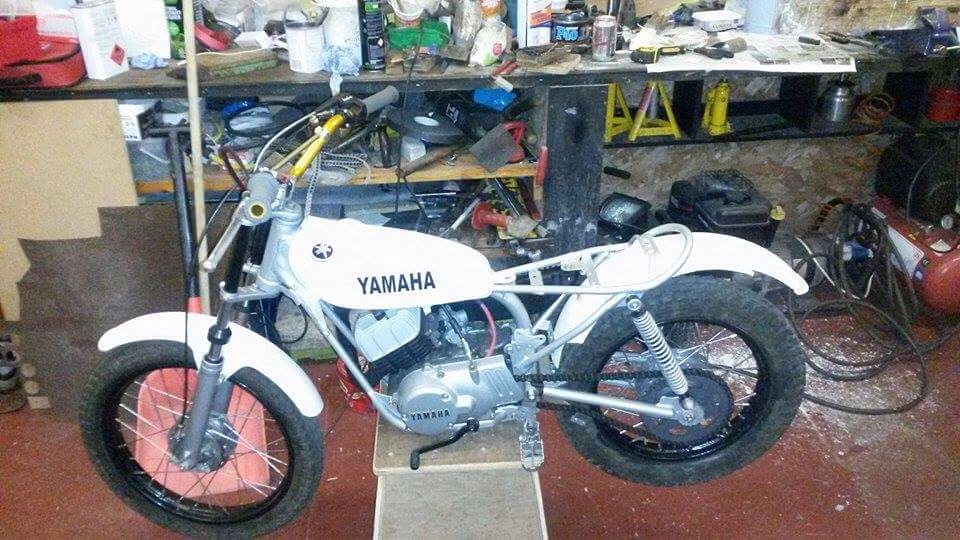
Hi, I'll try a small update of progress with the TY, she's not going to be original especially with the tank. The tank was a mess, full of holes and filler! After silver soldering up the pin holes, resin lining the inside and for belts and braces a full coat of fibreglass all over the outside, it is now bullet proof. I wanted to do something a little different from the standard graphics. this is how she is ATM, still in the progress of making a seat unit, then airbox.
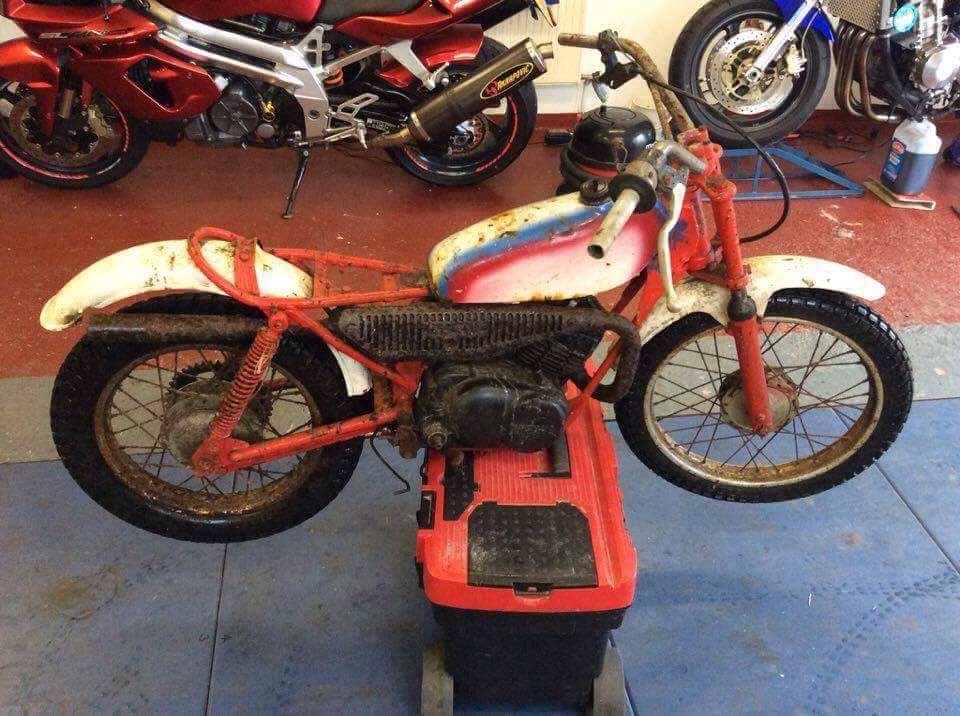
This is how she was when I got her! She was apparently destined for the skip before the fellow before me salvaged her.
I have various pictures of her as I went along. She was never going to be showroom or 100% original but atleast she'll perhaps live on a little longer.
Well I now know the exact engine and frame. She's a 1975 TY80 frame and a 1978 DT50M engine. I got this information from yambits so now I know. No idea how the gearing will be for hill climbing like oni nou said but I guess it'll be a bit of fun all the same and in the mean time I can keep an eye out for an actuall ty80 engine to put in some day.
Cool, I had a little look at some YouTube videos of guys on there TY 50s and they seem to have a lot of pep with them. He follows me around on his 70cc quad while I'm on my gas gas 250 txt pro but he can only go over very small bumps etc so if he can get the hang of the TY then we can venture out to more places. He's only 5 so it will be probably next summer before he can start having a shot.
I'll check out the big bore kits, they may be a nice little upgrade once he's older.
Hi, I took your sizes and while the engine is on the bench and the carb and reed block are off, I measured with a piece of firm stainless wire the bore size. I put the piston to tdc and I was able to measure underneath the piston from the front of the cylinder to the back of the inlet and I got 41mm so I guess I have a TY 50 engine in a ty80 frame. Im thinking once he gets bigger and perhaps the 50 gets too underpowered for him I can put on one of those big bore kits perhaps. Maybe the 50 will be ample for a long time? How does the 50 fare against the 80?
Thanks oni nou, it might end up coming to that eventually. I sent off the engine serial number through yambits, typically though the first 3 digits are readable as are the last 5 but the 6th digit in the line has got damaged sometime in the past making it unreadable. The frame does appear to have 80 rear shocks etc but the engine seems to be hinting at its a 50 with the shape of the barrel going on images on the Internet the 80 looks different. It will be whatever it is. I'm not sure how a 50 performs against an 80 but I guess we will find out once it's finished.
I'm thinking maybe at some point someone has put a ty50 into a ty80 frame and perhaps made one bike out of two.


Ty won't run
in Yamaha
Posted
Ha, you couldn't make this up. Went to the sons ty this morning, blue spark, put plug in and it starts first kick. Running great for about 1-2 minutes then nothing like you've hit the kill switch. Pull plug and no spark. So put a tester on the end of the source coil lead, put in gear and spin over and nothing, so like b40rt says must be the condenser.
Best bit is though, a friend comes over with his new montesa, so we go out for a play, him on his montesa and me on my gas gas. We've been out an hr or so and we swap bikes. Ten minutes later I notice him trying to start mine. I ride over and he says it just stopped, I try and it fires and runs for a few seconds but won't Rev, so back to mine, pull the plug and surprise surprise no spark!! Well a poor orange one. I had a new spare plug, put that one in, way hay blue spark! Up she fires, and off we go again. What is it with me and electrics lol, I think I need to stick to pedal power.